Bone-in pork loin on the BGE Large — the centrepiece version of my brined-loin cook
Published 8 June 2026 · Last updated 8 June 2026 · Tested by Ben Austen · Affiliate disclosure
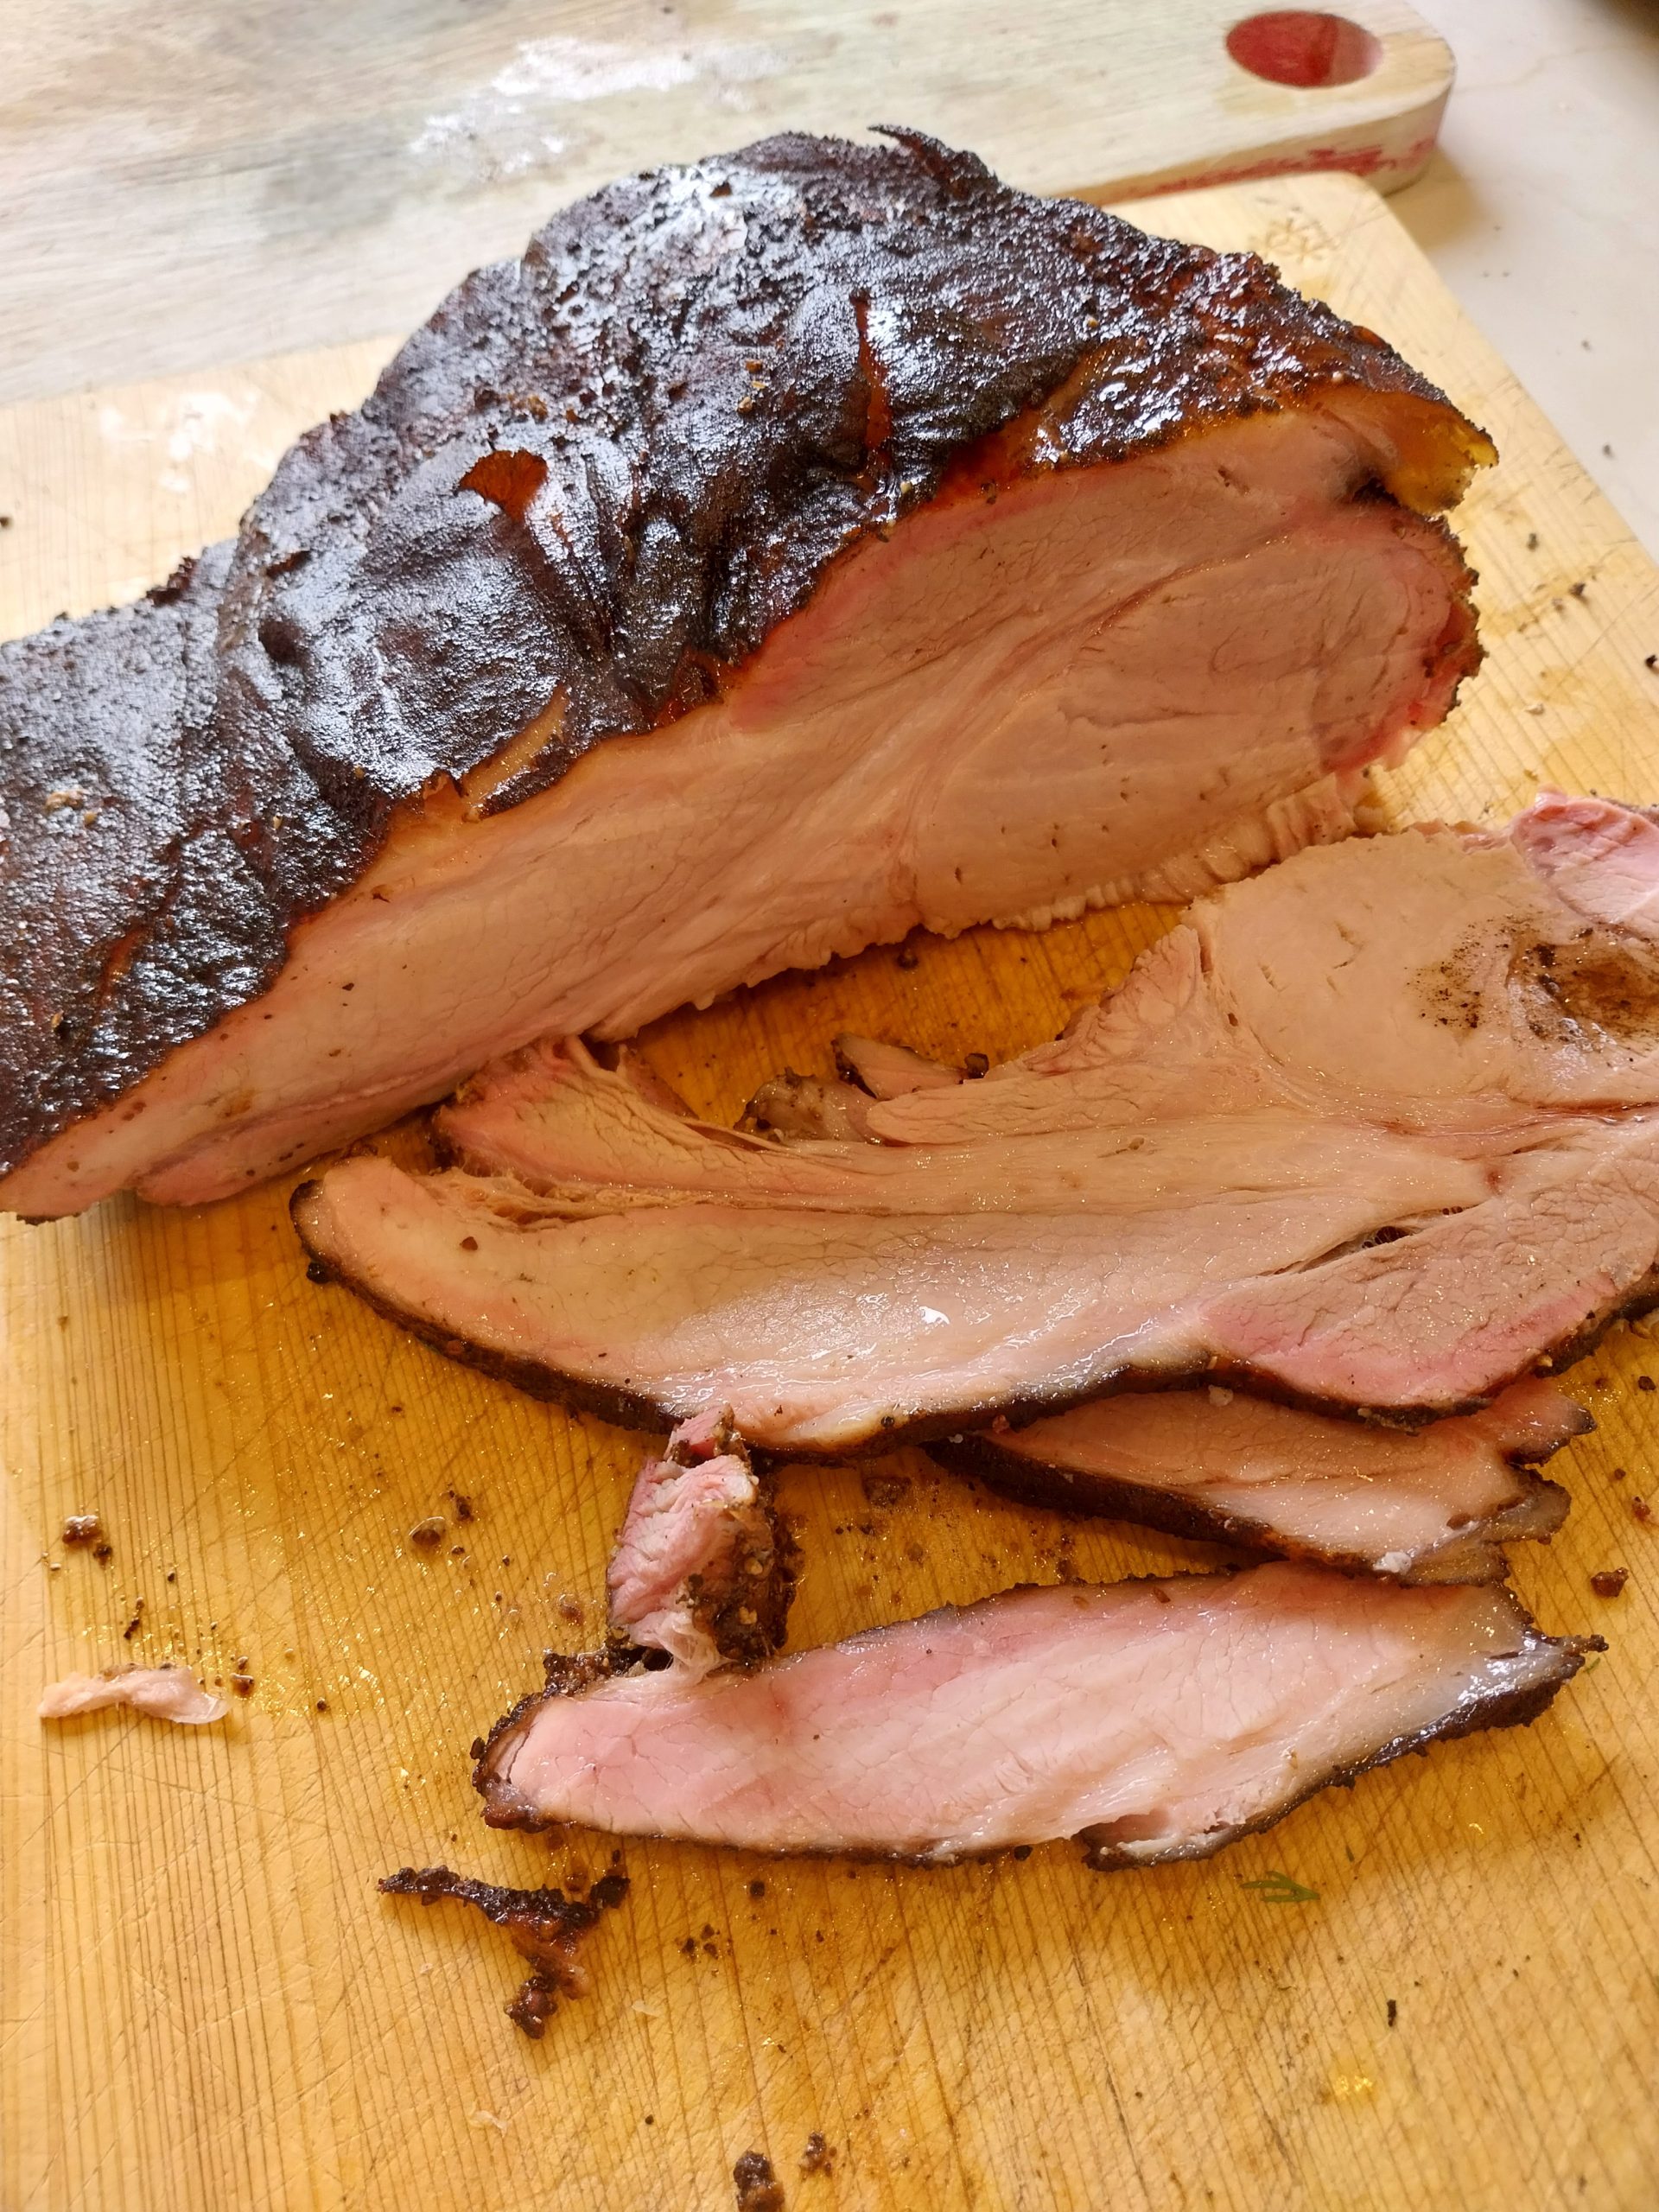
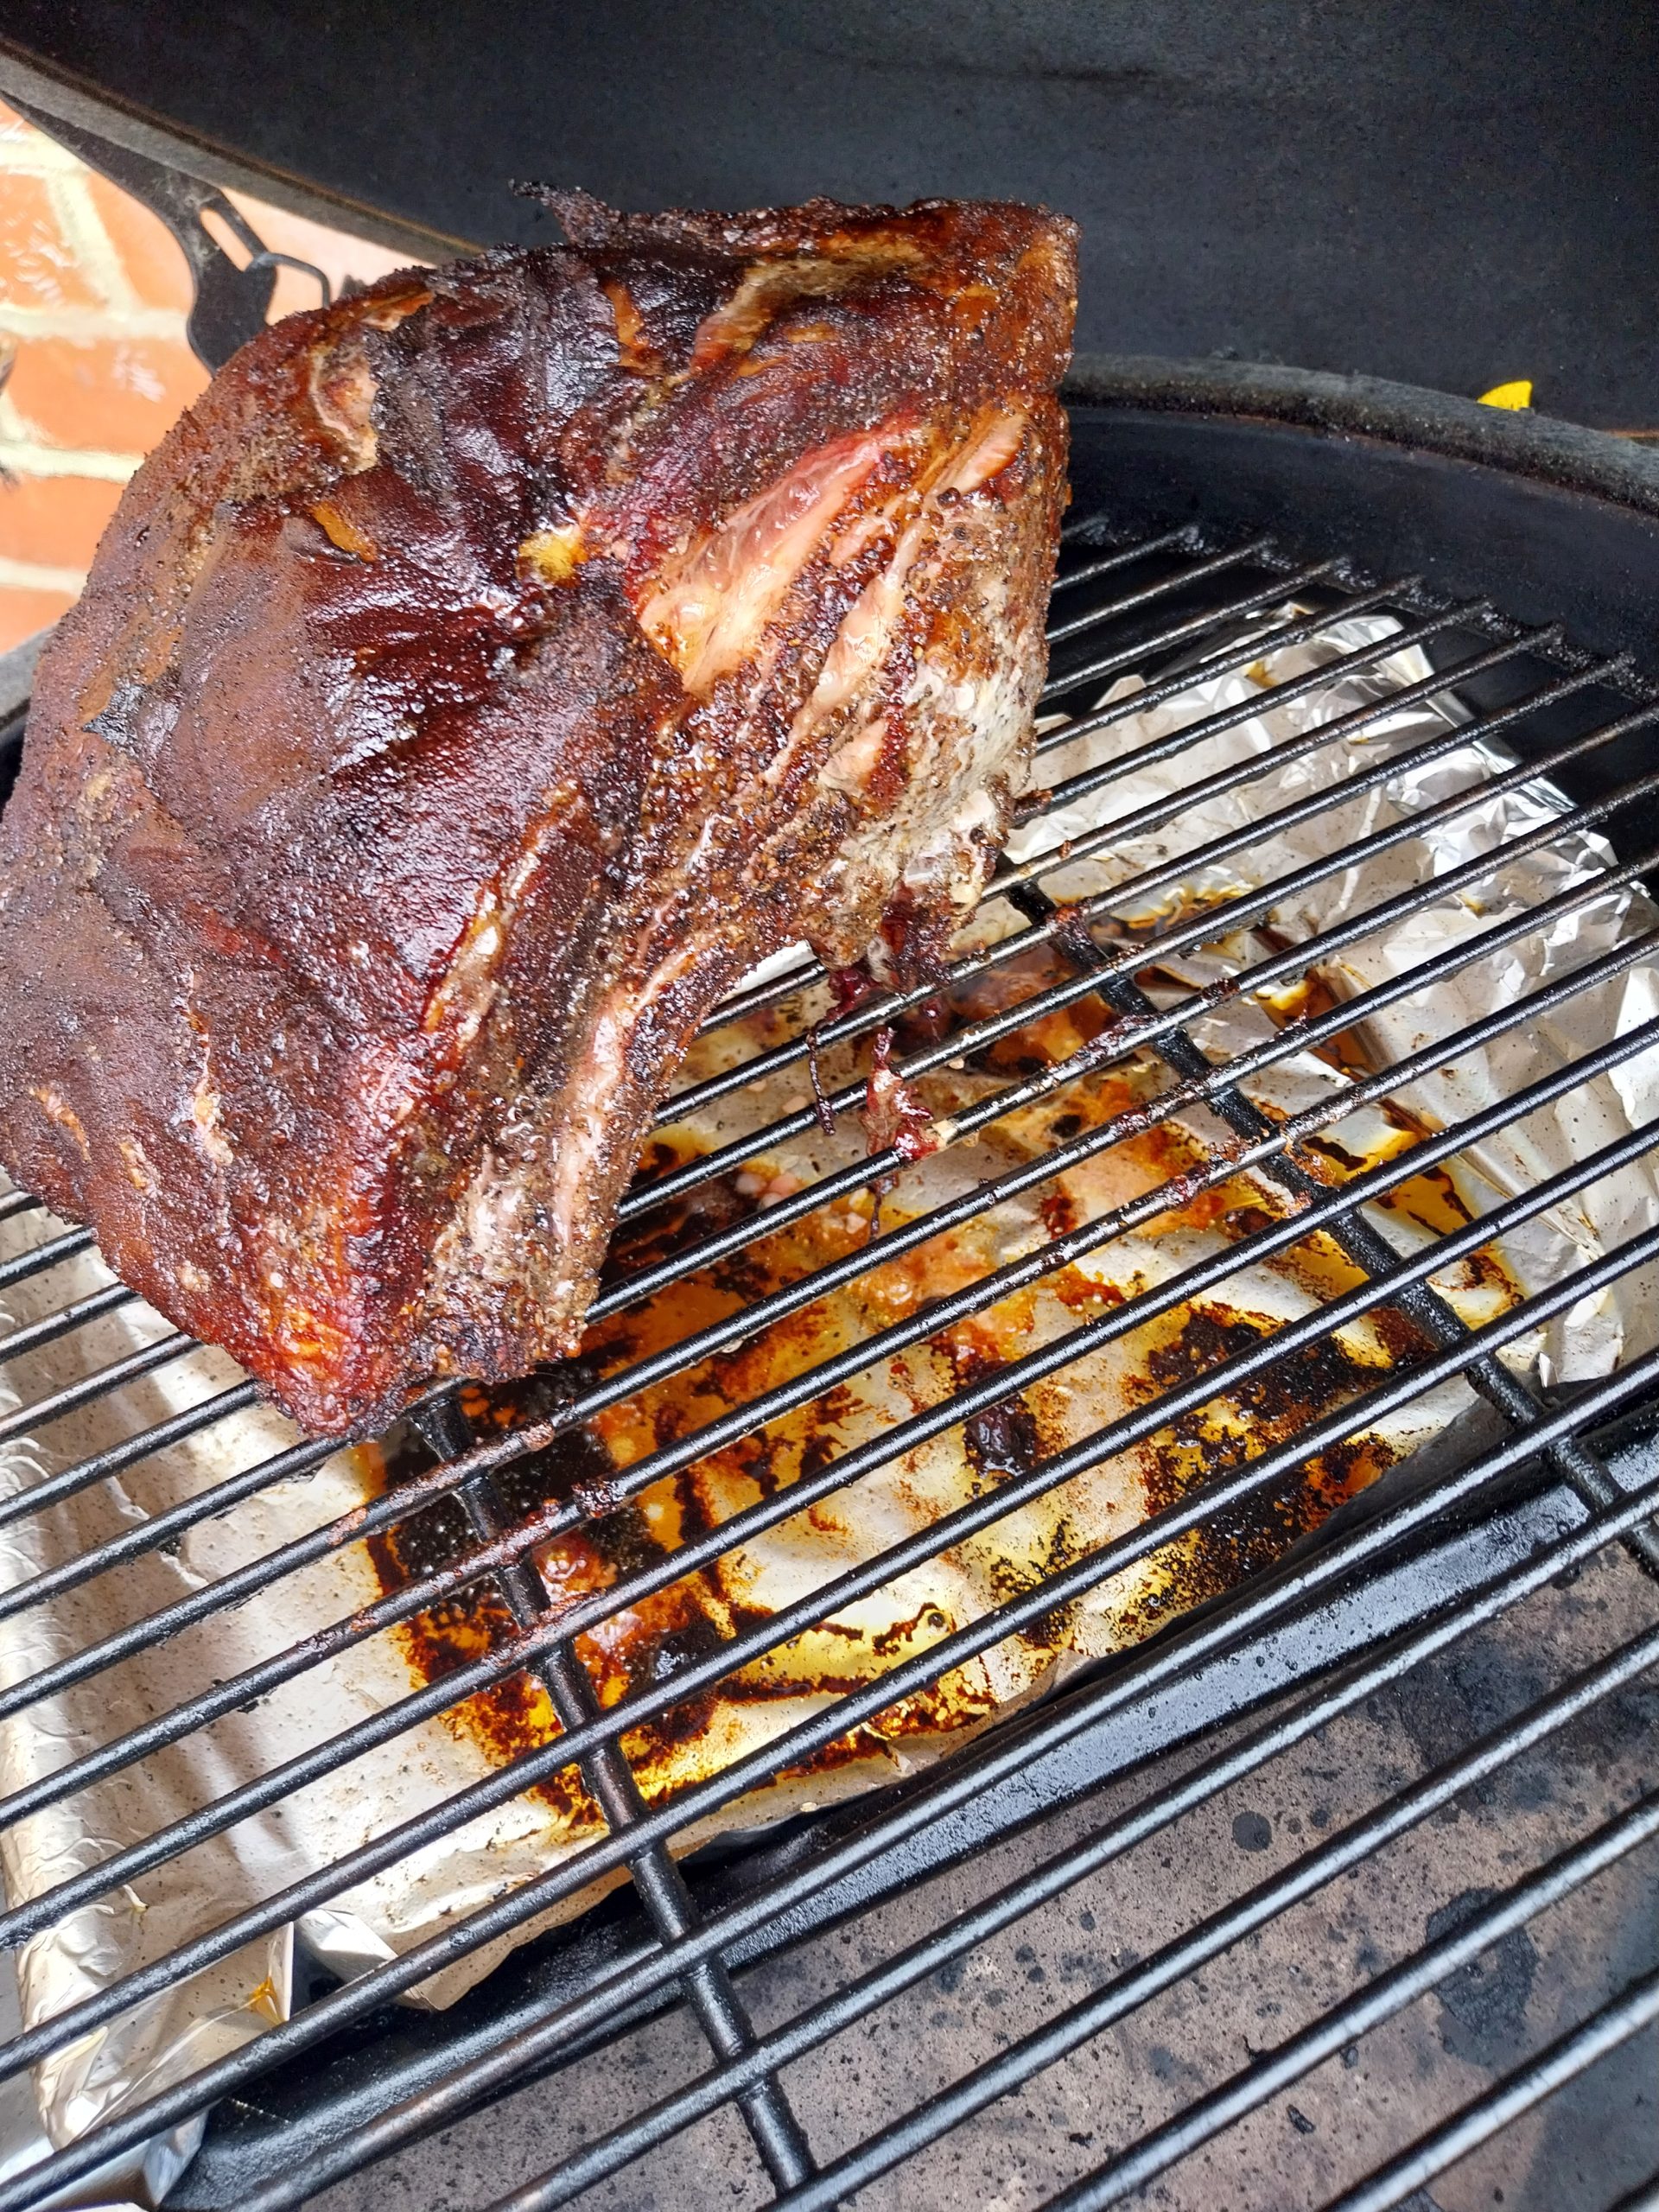
A 2.2 kg bone-in rack of pork — the chined-rib version of my boneless brined pork loin — brined for twenty-four hours, left to dry uncovered in the fridge overnight, rubbed in SPG, then smoked at 140°C indirect on the Big Green Egg Large over two small chunks of oak until the probe reads 61–62°C internal. Rest for forty minutes, lift the bones off, slice the loin like a roast (not a chop), and serve. I’ve run this cook twice in eight days — 31 May and 7 June — and got the same result both times: proper pink line edge to edge, a visible smoke ring, and a slice juicy enough that I wouldn’t change a thing.
Key takeaways
- Bone-in is the same brine, the same SPG rub, and the same indirect setup as the boneless loin recipe — what changes is the cook time, the carve, and the centrepiece presentation. If you’ve nailed the boneless cook, this is the considered next step.
- A 2.2 kg bone-in rack runs roughly 2.5 hours at 140°C dome indirect — about an hour longer than the 1.5 kg boneless cook at the same temperature, because bones cook slower than the muscle around them. I pull at 61–62°C internal, a degree below the boneless cook, and let a 40-minute rest in a cold oven carry the slice to the same medium-pink finish.
- The bones lift off the loin in one piece after the rest — provided you’ve asked the butcher to “chine” the rack for you. Chining means cutting through the backbone where it meets the ribs so the rack comes home pre-loosened. Any decent independent butcher will know what you mean and do it on the spot at no extra charge — it takes about thirty seconds with a saw. With the bones off, you carve the loin into slices like a boneless roast, not individual chops. A deliberate choice; I think it serves a Sunday table better than chop-style portions.
- Two oak chunks the size of kindling are the smoke load for the longer cook. The longer time under smoke gives the bone-in version a more pronounced smoke ring and a slightly deeper bark than the boneless cook at the same temperature.
- Bone-in is more forgiving on timing — the rack sits in the sweet-spot window for longer than a boneless cook does, so a fifteen-minute overshoot on the kamado isn’t the disaster it would be on a faster-cooking 1.5 kg boneless loin. If you’re cooking for guests on an unfamiliar timeline, that wiggle room matters.
Bone-in vs boneless — which one should I cook?
| You should cook… | If you… |
|---|---|
| Boneless brined pork loin | Are doing this for the first time, want the cook done in 90 minutes, are feeding 4–6 people, or care more about Monday’s cold sandwich than about Sunday’s presentation |
| Bone-in (this recipe) | Have done the boneless cook at least once, are happy with a 2.5-hour cook window, are feeding 6–8 people at a sit-down Sunday lunch, want a stronger smoke ring, or want the rack on the table as a centrepiece before it gets carved |
The two recipes share most of the moving parts. Different cut, slightly different timing, different end result on the plate. Pick the one that matches the meal you’re cooking, not the one that sounds more impressive.
At a glance
| Spec | Detail |
|---|---|
| Prep time | 15 minutes (active) — plus 24 hours brine, plus overnight dry-finish in the fridge |
| Cook time | ~2.5 hours on the kamado |
| Total time | ~30 hours from brine-start to plate |
| Servings | 6–8 hot, plus Monday cold-sandwich leftovers |
| Method | Kamado, indirect heat |
| Temperature | 140°C dome, pulled at 61–62°C internal |
| Rest | 40 minutes in a cold oven, foil-wrapped |
| Difficulty | Medium (assumes you’ve already cooked the boneless version) |
| Equipment | Kamado, ConvEGGtor (heat deflector), probe thermometer, foil, food-safe brining container, two oak chunks |
| Cuisine | British |
What you’ll need
Equipment
- A kamado-style barbecue capable of holding 140°C steady for two and a half hours. I cook this on my Big Green Egg Large; any 46cm-class ceramic kamado with a heat deflector will work the same way.
- A ConvEGGtor or equivalent ceramic heat deflector. Indirect heat is non-negotiable — direct heat at 140°C scorches the outside long before the bone-in centre catches up.
- A probe thermometer. If you’ve got the option, a leave-in probe is what I’d reach for over an instant-read for this cook — being able to watch the temperature climb in real time over two and a half hours is worth more than having to crack the dome every fifteen minutes to spot-check. An instant-read works perfectly well if it’s what you’ve got. On a bone-in cut you want the probe sitting in the thickest part of the muscle, not touching the bone — the bone reads hotter than the meat and will give you a false-high number.
- A food-safe brining container with a lid, large enough to fully submerge a 2.2 kg rack of pork. The shape of a bone-in rack is awkward — a deep rectangular tub usually fits better than a round one.
- Aluminium foil for wrapping during the rest.
- Two oak chunks, about the size of kindling pieces. I get mine from a tree that came down at my parents’ a couple of years back; any seasoned hardwood you can split into chunks works. Apple, cherry, or hickory all pair with pork; oak gives the cleaner background note I prefer.
- A roasting tin or carving board for the rest and the carve.
- A sharp knife for lifting the rib bones off the loin after the rest.
Ingredients
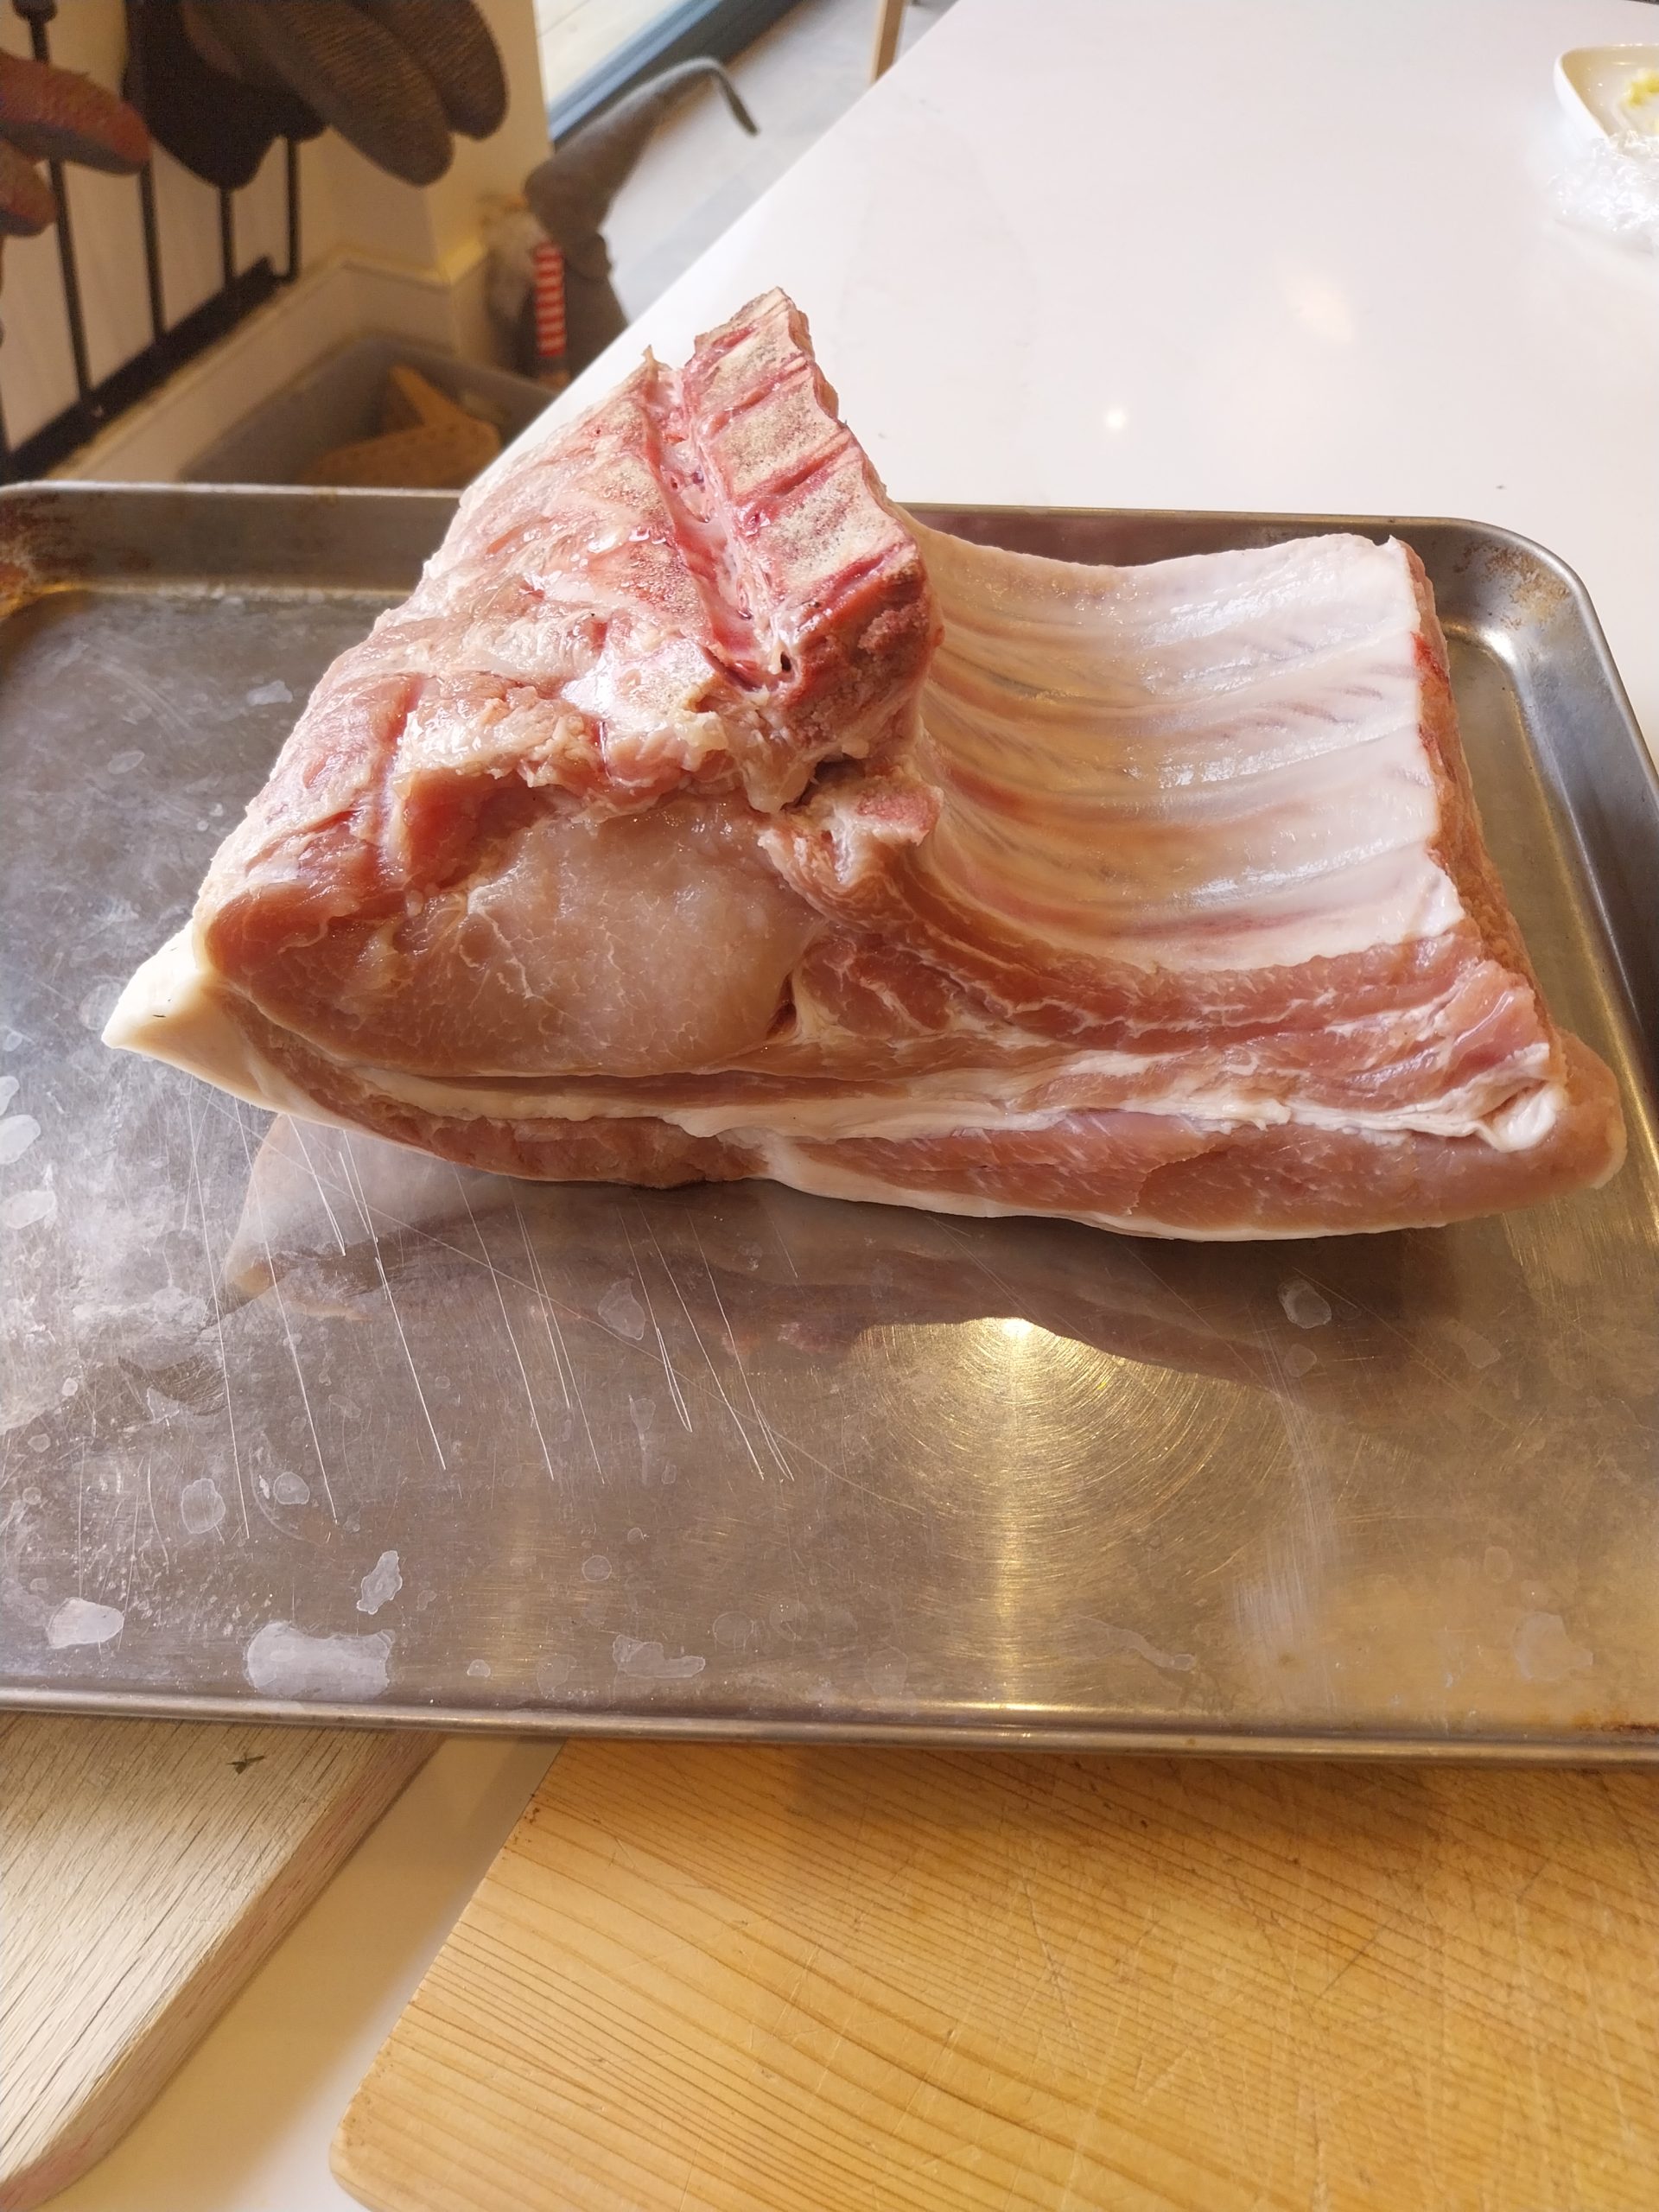
- 2.2 kg bone-in rack of pork, chined by your butcher. Ask for “a chined pork rack” — chining means cutting through the backbone where it joins the ribs so the bones lift off the cooked loin cleanly in one piece. Any decent independent butcher will do it on the spot at no extra charge; it takes about thirty seconds with a saw. I get mine from Graham Turner Family Butchers near Wisley in Surrey — no website, but Google Maps will get you there. The skin and fat cap come off pre-cook and go to a separate crackling cook in the oven (see Variations — I don’t do bone-in crackling on the BBQ; the oven is genuinely easier for this cut).
- Table salt, at 3% of the water weight in the brine. Use table salt, not Maldon — Maldon’s coarser flakes mean less actual salt per measured volume.
- Caster sugar, at 3% of the water weight in the brine. Equal parts to the salt.
- Black peppercorns, a tablespoon, whole, for the brine.
- Bay leaves, three or four, for the brine.
- For the SPG rub: black pepper, table salt, and garlic granules at a ratio of 2 : 1 : 0.5 by volume. Roughly four tablespoons of black pepper, two tablespoons of salt, one tablespoon of garlic granules covers a 2.2 kg rack with a little left over.
A note on the SPG ratio: the bone-in cook leans pepper-forward at 2:1:0.5, where the boneless recipe runs 1:1:0.5 (equal salt and pepper). The brine has already taken care of most of the seasoning by the time the rub goes on; with a longer cook over oak, the pepper-forward rub stands up better to the smoke and gives the bark a sharper edge on slicing. If you prefer the boneless 1:1:0.5 ratio, that works too — neither is wrong.
The cook method
1. Work out the brine by weighing the water
I drop the rack into the brining container, fill with cold water until the meat is just covered, lift the rack back out, then weigh the water that’s left. That weight is what the 3% calculations work off. A 2.2 kg bone-in rack in a snug container usually needs around 2–2.5 litres of water, but the bone shape means the exact volume depends on your container — weigh, don’t guess. Same method as the boneless cook; scales to any size of meat.
2. Make the brine and submerge the rack
I weigh out 3% of the water weight in table salt, the same in caster sugar, dissolve both into the water, then add the peppercorns and bay leaves. Drop the rack in, fully submerged, lid on, into the fridge for twenty-four hours. The brine isn’t doing anything different for a bone-in cut than it does for a boneless one — the salt brings the seasoning up evenly through the whole muscle and the sugar balances it. Same method I documented at length in the boneless loin recipe; same timing, same result.
If the skin and fat cap are still attached, take them off before brining and put them aside for the crackling cook (see Variations). The bone-in rack brines on its own.
3. Dry-finish uncovered overnight in the fridge
After twenty-four hours in the brine I lift the rack out, pat the surface dry with kitchen paper, sit it on a rack over a tray, and leave it in the fridge uncovered overnight. The dry-finish does the same two jobs it does on the boneless cook: it firms the surface so the SPG rub adheres cleanly, and it pulls surface moisture down so the kamado’s convection environment gets to bark formation instead of fighting wet meat.
4. Apply the SPG rub
I mix the SPG rub — four tablespoons of black pepper, two tablespoons of table salt, one tablespoon of garlic granules — and press it firmly into every surface of the rack including between and over the rib bones. No binder, no mustard slather, no oil; the dry-finished surface holds the rub on its own.
The same honest caveat about the garlic granules carries over from the boneless recipe: I’m not entirely sold on UK garlic granules as the right SPG component, and I’d happily test garlic powder as the alternative. The salt-and-pepper parts of the SPG are doing the work; the garlic component is the test-the-alternatives bit.
5. Set up the kamado at 140°C indirect with two oak chunks
I light the kamado single-spot minion-style and run it slowly on the way up. At 140°C dome temperature on the BGE Large in UK ambient conditions, both vents end up barely cracked open — closing down earlier than feels natural is the discipline. American BBQ articles calibrate to warmer ambient temperatures and routinely overshoot in UK conditions.
I drop two oak chunks onto the lit lump before the ConvEGGtor closes the firebox. Two is enough for a two-and-a-half-hour cook — they smoulder gradually rather than burning fast and clean off. ConvEGGtor in, grid on top, dome closed. Let it settle and hold 140°C for ten to fifteen minutes before the rack goes on; you want the ceramic walls fully heated, not still climbing.
6. Cook unwrapped on the grid for ~2.5 hours until the probe reads 61–62°C
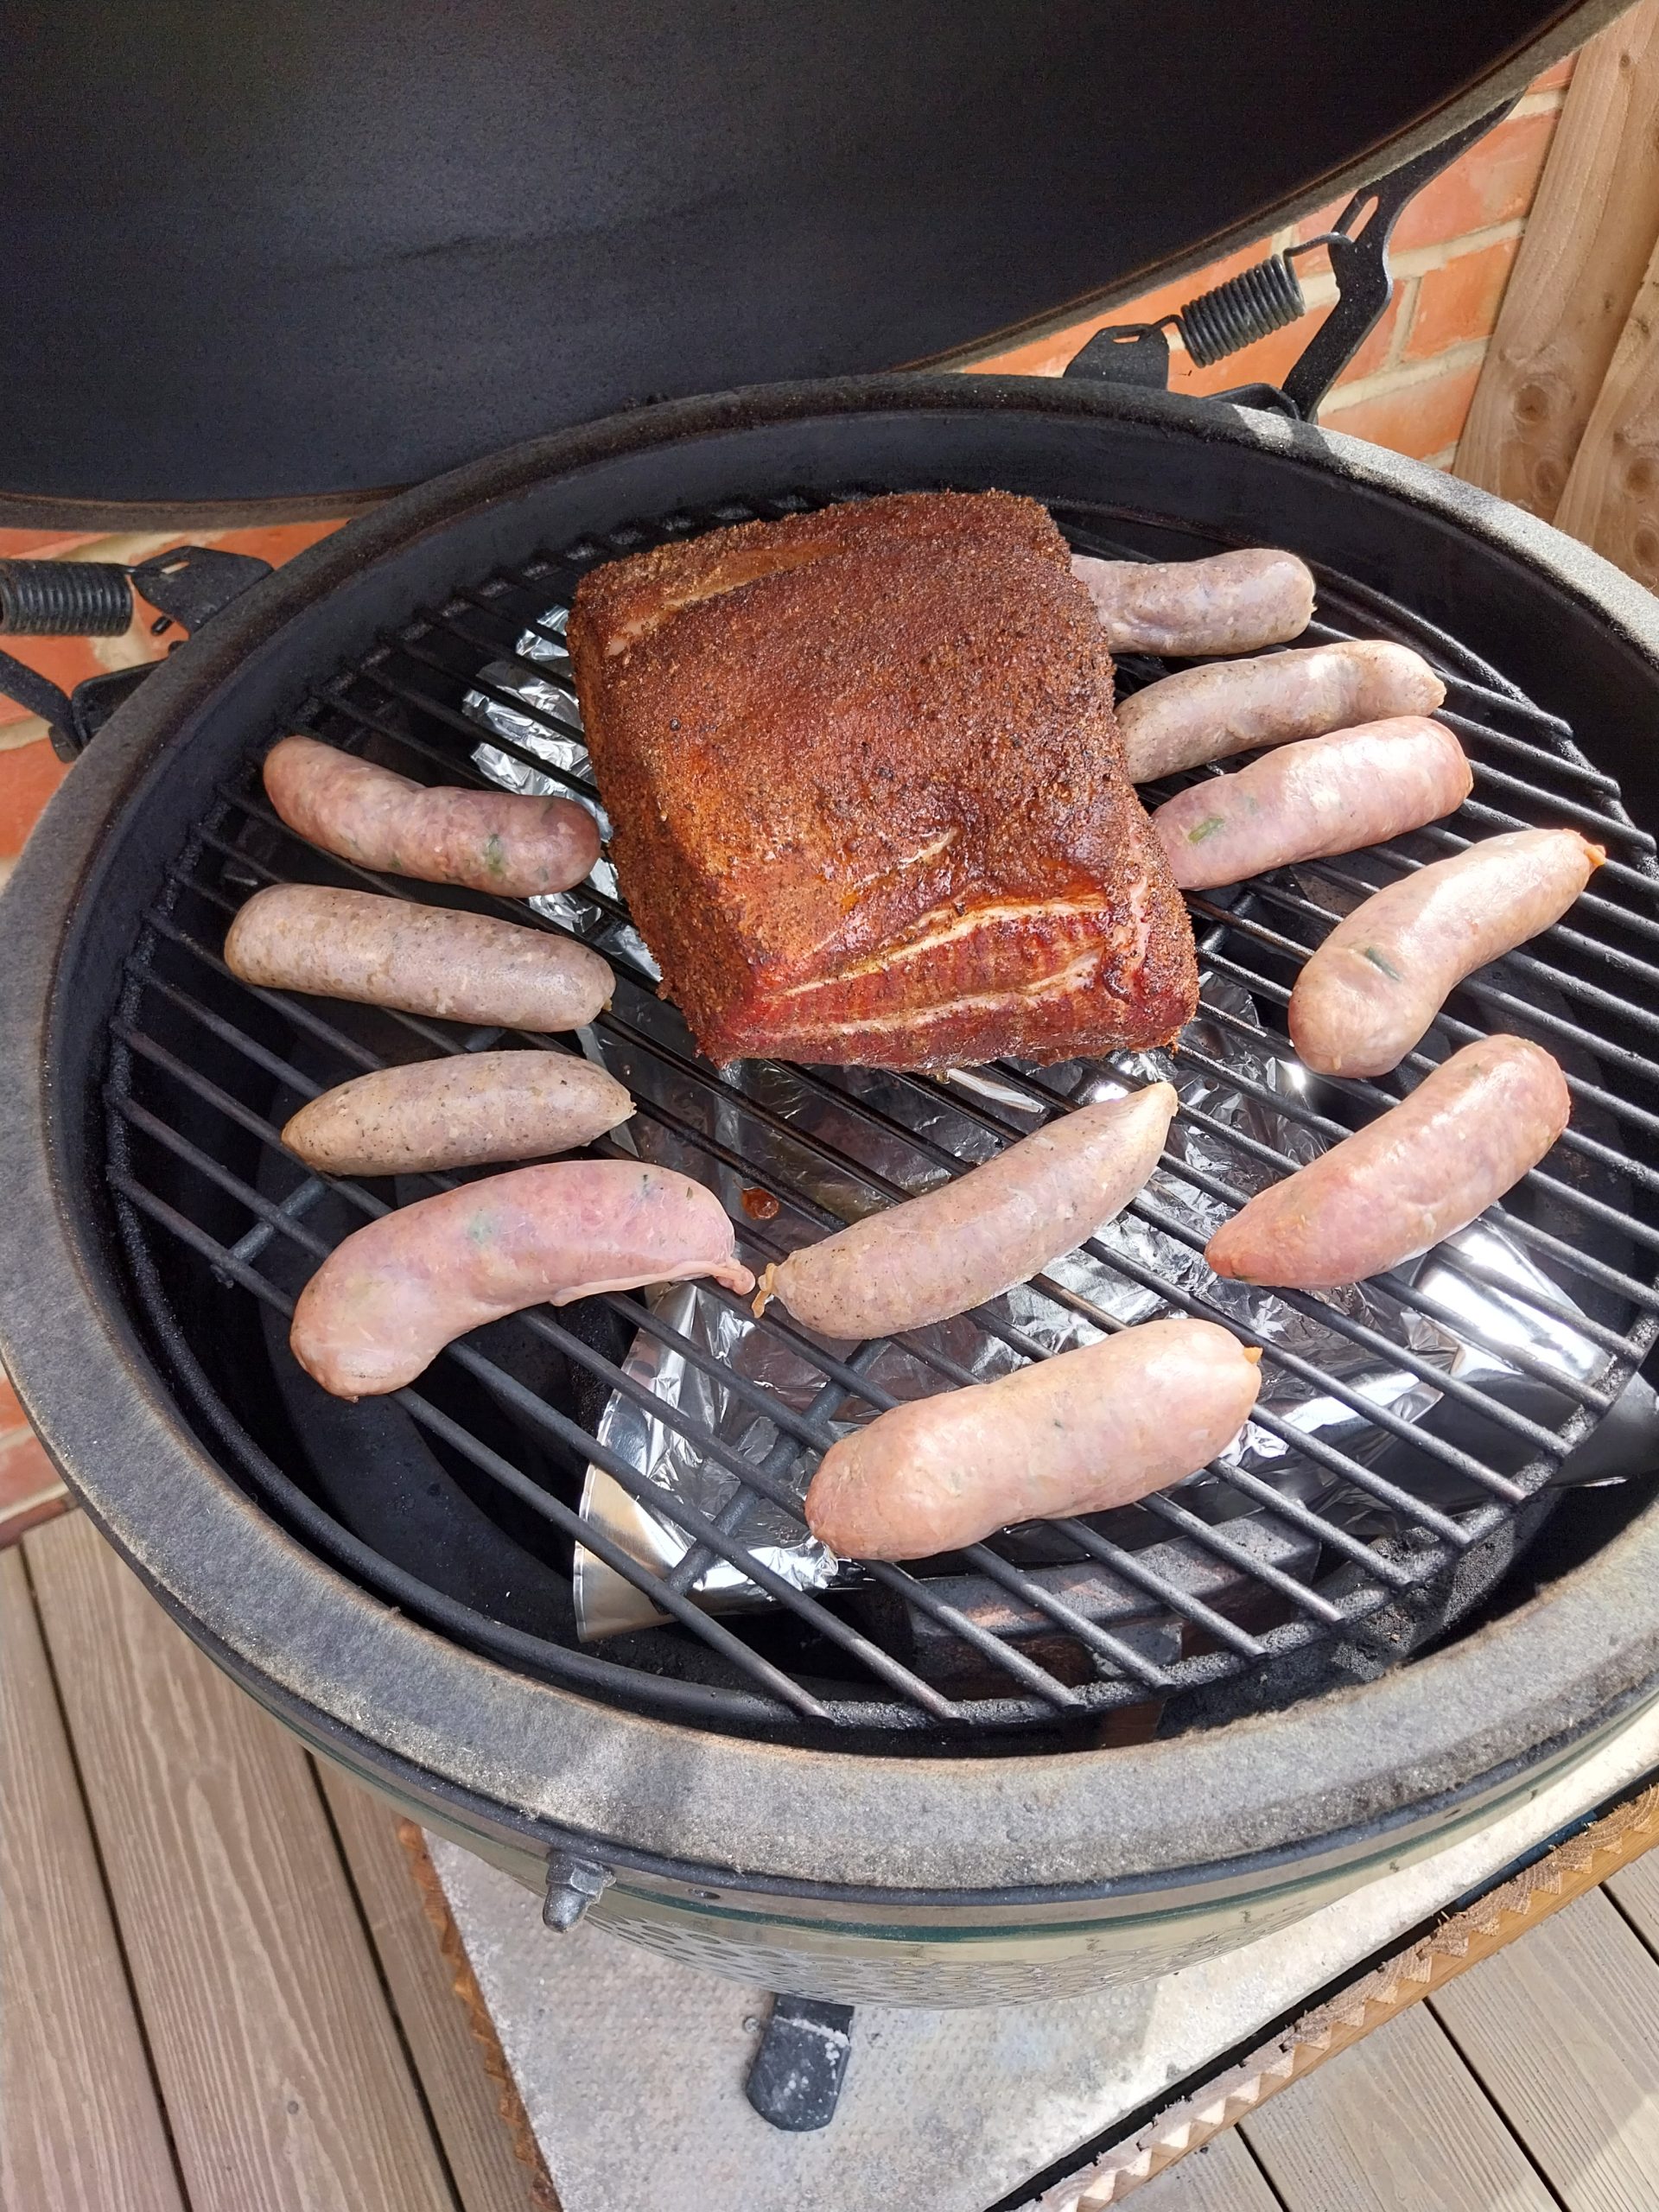
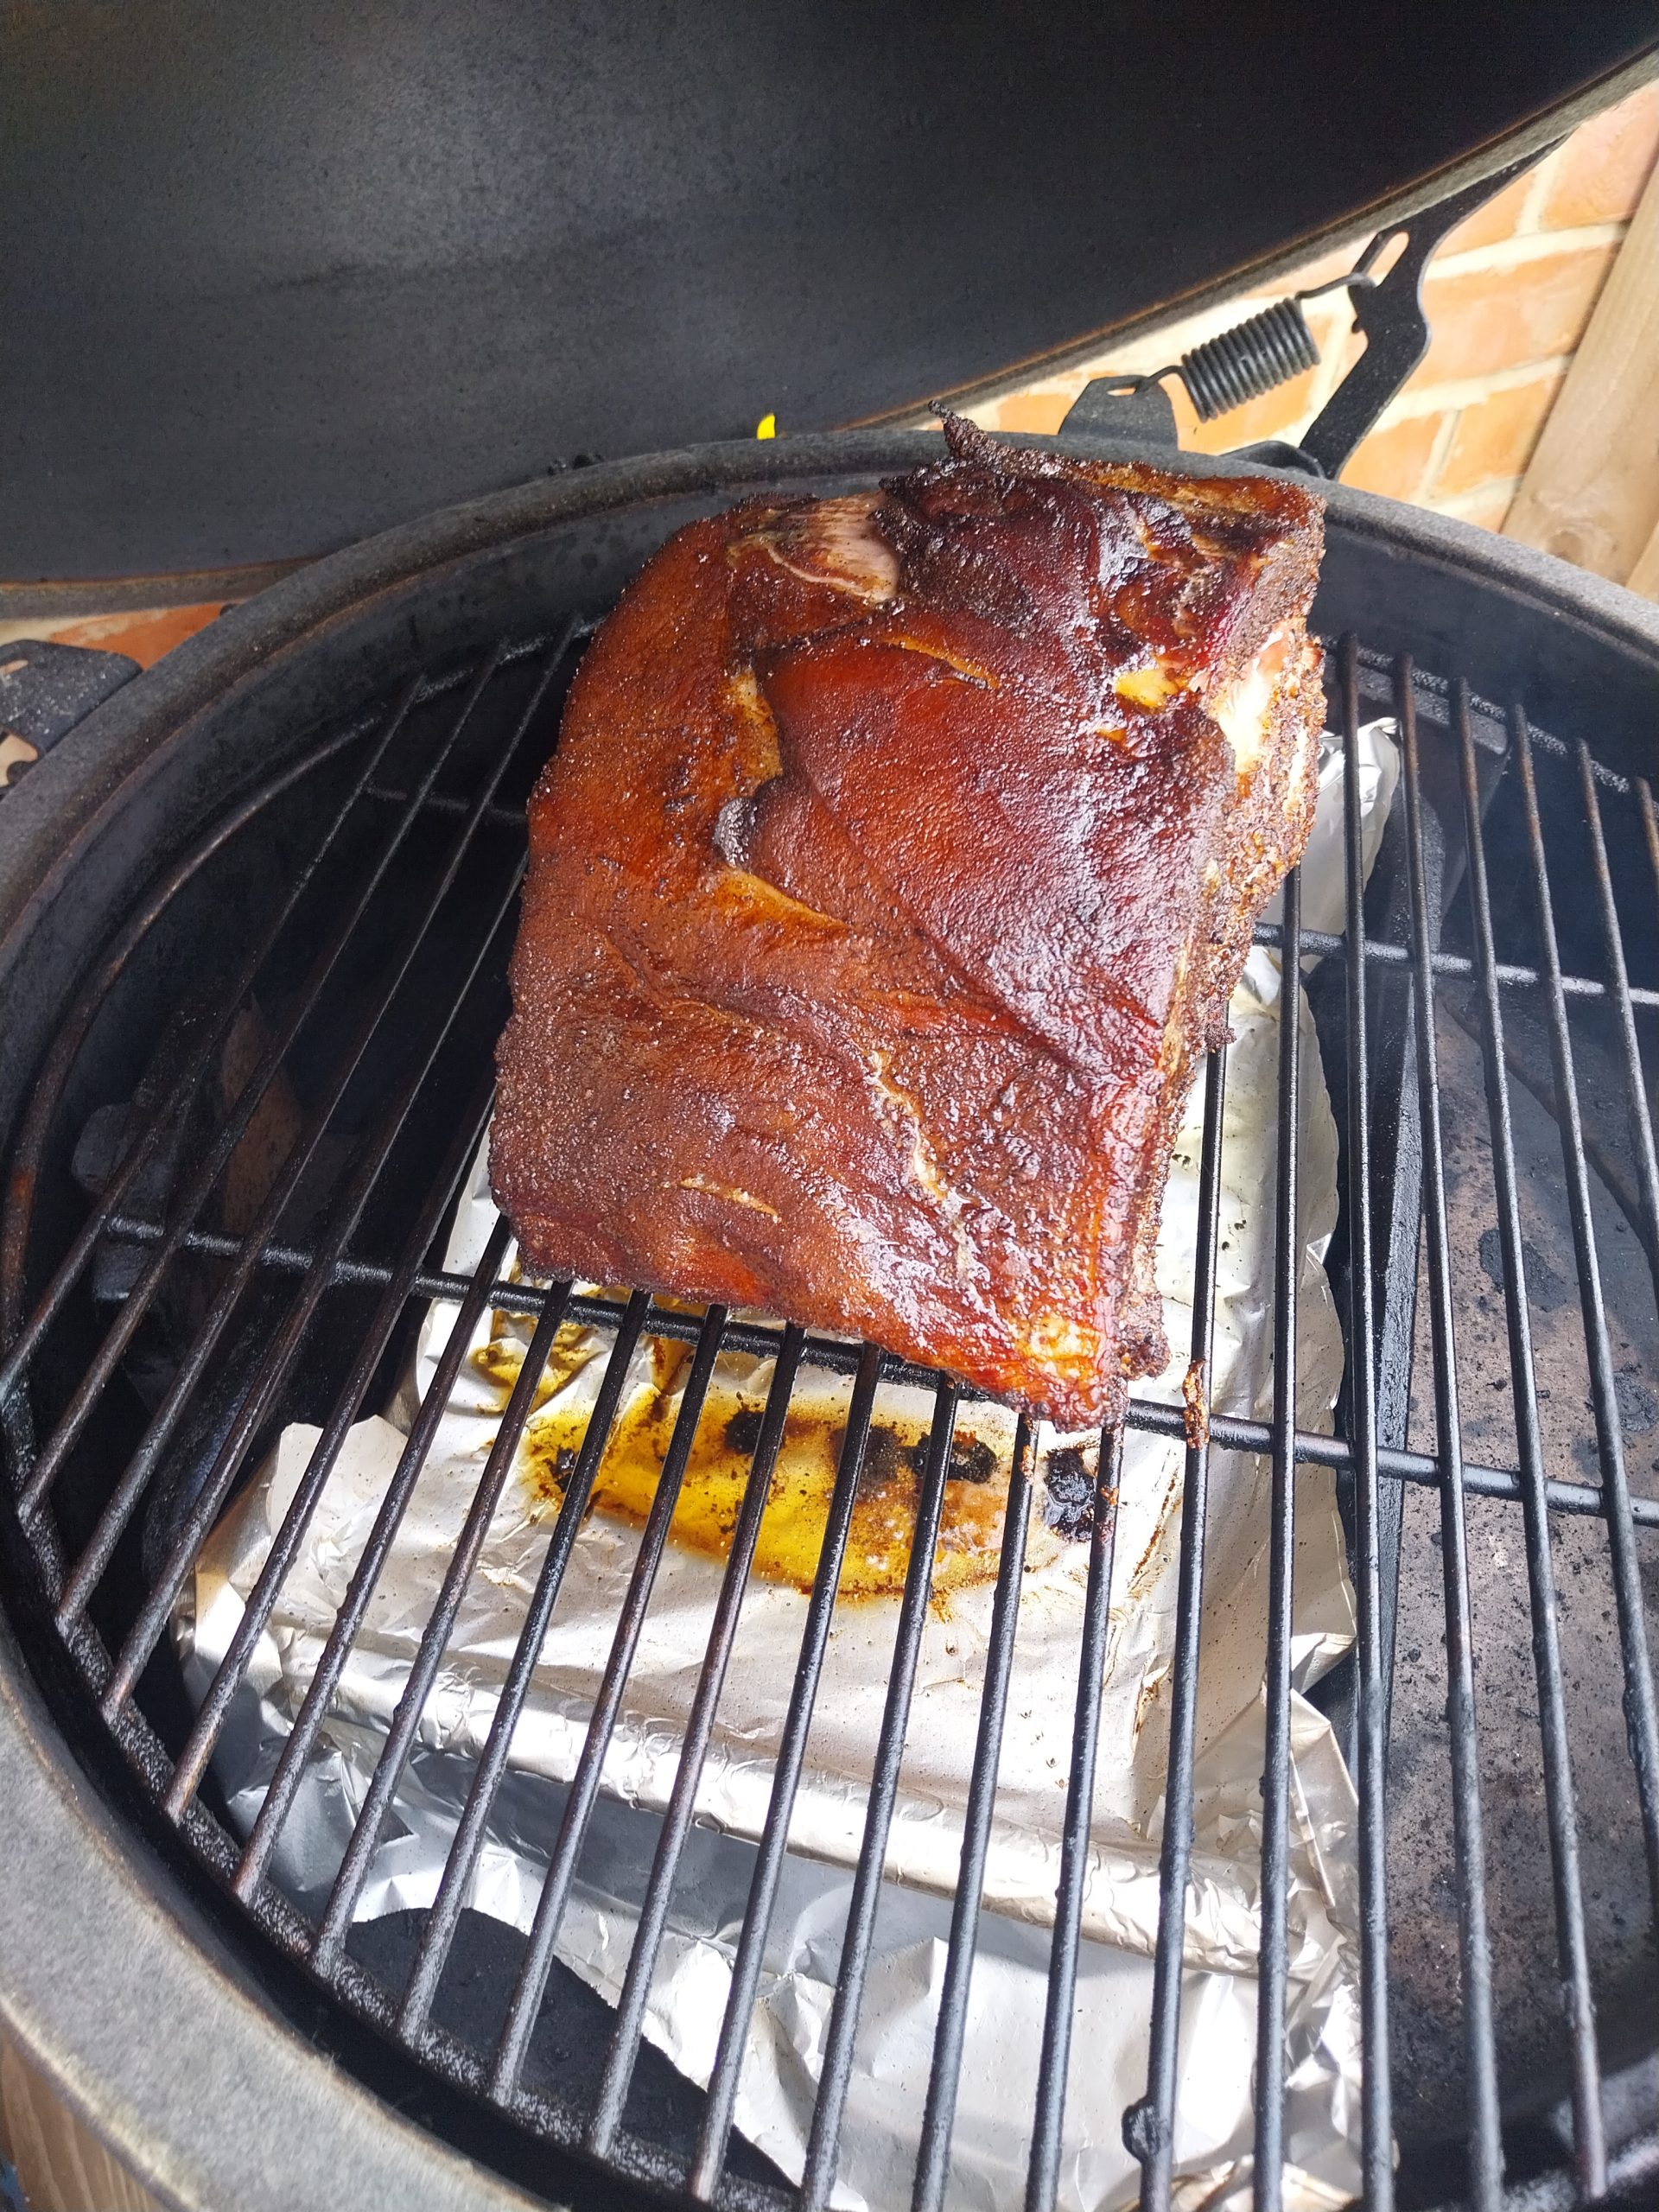
I sit the rack straight on the grid, bone side down, fat side up, and slide the probe into the thickest part of the muscle — well clear of the bones. The fat cap melted earlier with the skin removal, but the muscle itself holds its own moisture; the cook is dry-environment indirect, no foil, no tray, no spritzing.
A 2.2 kg bone-in rack takes about two and a half hours at 140°C dome to reach 61–62°C internal — roughly an hour longer than the 1.5 kg boneless cook at the same temperature. Bones cook slower than the muscle around them, which is the reason for the extra time. I check the probe at 90 minutes to see where the temperature curve is sitting, then every 15–20 minutes after that. Trust the probe over the clock — variance is real and depends on starting temperature, dome hold, and probe calibration.
I pull at 61–62°C internal, a degree below the 63°C I use for the boneless cook. The bones keep the rest warm and the carry-over takes the slice to a juicy 64–65°C at serve — safely above the UK food-safety guidance of 63°C for whole-cut pork. If you’d rather pull at 63°C and let the rest finish slightly hotter, that works too.
7. Pull, foil-wrap, rest in a cold oven for 40 minutes
The moment the probe reads 61–62°C, the rack comes off. I wrap it in a double layer of foil, sit the foil packet in a cold oven (oven off, door closed), and pile a tea towel on top for extra insulation. The cold oven is the resting environment — keeps the rack warm without continuing to cook it.
Forty minutes is the right rest time for this cook. On the boneless I’ll happily rest for over an hour if the meal isn’t ready; on the bone-in version I keep the rest tighter, around forty minutes, because the bones keep the heat in well and a longer rest pushes the internal higher than I want. If you’ve timed the rest of the meal to land at the forty-minute mark, that’s the move.
8. Lift the bones off, slice across the grain, serve
Unwrap the rack onto a wooden board. With a sharp knife, run along the inside of the rib bones where the butcher chined the backbone — the bones should lift away from the loin cleanly in one piece. (Save the bones for stock or for the dog; I usually do both.) Now you’ve got a boneless loin on the board, sitting in its own juice. Slice it across the grain at about a centimetre thick, the same as you’d slice the boneless cook.
The slice should be evenly pink-medium from edge to edge with a visible smoke ring along the outer rim — that’s the brine plus the long indirect cook plus the rest plus the oak doing what they’re supposed to do.
What to serve it with
The 31 May cook was a Sunday lunch for a table of six adults: bone-in pork loin sliced, smoky-mayo potato salad, rainbow chard and kale lifted from the garden that morning, bread, and a separate tray of pork crackling that came out of the oven while the loin was resting. Pan-fried crispy sage leaves — also from the garden — went over the slices at the table. The bones got handed round to anyone who wanted to pick at them; the slices went onto plates. Beer or a light red.
The 7 June cook ran the loin alongside smoked sausages on the cooler edge of the grate — the sausages took on the smoke from the same two oak chunks for the last hour of the pork loin cook, and got served alongside the sliced loin as a second protein for a less formal mid-week table.
For Monday: cold-pork-loin sandwiches. White bread, mustard, mayonnaise, salad. The bone-in version’s slightly deeper smoke ring shows up even more pronounced on Monday’s cold slice than on the warm Sunday plate.
What I learned, and what I’d do differently next time
The headline lesson from two cooks: bone-in is the same recipe with more wiggle room. The cook is more forgiving on timing because bones cook slower than the muscle around them — a fifteen-minute overshoot at the kamado doesn’t translate to a fifteen-minute overcook of the slice. The window where the meat sits in the sweet spot before drying out is wider on a bone-in cut than a boneless one. For a Sunday lunch where you’re cooking with the kids around and not watching the kamado like a hawk, that buffer matters more than the bone-in version sounds like it should.
The two-cook validation matters too. The 31 May cook was the first time I’d run this method bone-in; the 7 June cook was the same method on a similarly-sized rack from the same butcher, with smoked sausages alongside as the only variable. Same brine, same dry-finish, same SPG (2:1:0.5 ratio), same 140°C indirect, same two oak chunks, same probe pull at 61–62°C, same 40-minute rest. Same result on the plate: pink line edge to edge, visible smoke ring, juicy slice. That’s what tells me the method holds — one perfect cook can be luck; two perfect cooks back-to-back is the recipe.
The carve choice is the one I’ve thought about the most. The default move with a chined rack is to cut between the bones and serve chops — pork-chop portions, one per person, with the bones still attached. I tried that mentally and decided against it: the chop format is a slightly different meal (smaller portions, bone-on-plate, fiddlier to eat round a Sunday table with kids), where lifting the bones off and slicing the loin into roast-style slices keeps the meal feeling like a sit-down roast. Both are valid — but for the centrepiece-Sunday-lunch framing this recipe is sitting in, the slice format wins.
The one thing I’d try differently next time: I’d take a slightly bigger rack — 2.5 kg rather than 2.2 kg — to push the cook time out to closer to three hours and see whether the smoke ring deepens further. The 2.2 kg is comfortable on the BGE Large grid; the 2.5 kg version would still fit and would carry the longer smoke without the cook becoming a project. That’s a next-cook experiment.
The other variable worth flagging: the 2:1:0.5 pepper-forward SPG is what I’m running on bone-in and I’d stand behind it after two cooks. The 1:1:0.5 ratio from the boneless recipe would also work; it’d give a softer-bark, less pepper-led slice. I prefer the pepper-forward version against the longer smoke; if you don’t have strong feelings either way, the 2:1:0.5 ratio is the one I’d reach for.
Variations
The crackling cook goes in the oven, not on the BBQ. On the boneless cook I take the skin and fat cap off, knife-dice it, and run it on the kamado at 140°C alongside the loin — that gets its own recipe at Pork crackling on the kamado. For the bone-in cook I do the crackling in a domestic oven instead, at 200°C fan, in a foil-lined tray. The reason is practical: bone-in racks are awkward to fit alongside a crackling tray on the same kamado, and the oven gets the same head-rattle result with less juggling. The oven crackling recipe is on the to-do list; for now, follow the kamado method but run it at 200°C oven fan for 35–40 minutes.
On a bigger or smaller rack, the brine scales linearly — same 3% salt, same 3% sugar, same twenty-four hours. The cook time scales with the bone-in mass: a 1.8 kg rack will run closer to 2 hours, a 2.5 kg rack closer to 3 hours, both at the same 140°C dome. Trust the probe.
On another kamado, the principle is identical: indirect at 140°C, two oak chunks, probe to 61–62°C internal. Any 46cm-class kamado with a heat deflector should hit the same numbers. I haven’t run this specific cook on a Kamado Joe Classic or a Monolith — but the underlying technique doesn’t depend on the BGE specifically.
On a kettle barbecue, set up indirect (coals to one side, rack on the other), aim for a dome temperature in the 130–150°C range, and run the longer cook to compensate for less stable temperature control. I haven’t tested this myself — I’ll update this section after I’ve run the cook on the Weber Master-Touch GBS to confirm.
Without the bones (the boneless version): that’s a different recipe. The boneless brined pork loin is the starting-point cook and the one to reach for if you don’t have a chined rack to hand. Pull at 63°C, rest for an hour, slice the same way.
Related
- Boneless brined pork loin on the BGE Large — the starting-point version of this same recipe, in the same brine, same SPG family, faster cook
- Pork crackling on the kamado — the bar-snack bite-size method — what to do with the skin off a boneless loin (oven method coming for the bone-in version)
- Big Green Egg Large — Tested by Ben review — the kamado I cook on
- About Ben — who’s behind this
Frequently asked questions
How long does a bone-in pork loin take on a kamado?
A 2.2 kg bone-in rack takes around 2.5 hours at 140°C dome indirect to reach 61–62°C internal — about an hour longer than the same-weight boneless cook because bones cook slower than the muscle around them. Bigger racks run proportionally longer; trust the probe over the clock. Plan on roughly 1 hour per kilo plus an extra 30 minutes for the bone-in factor.
What internal temperature should I pull a bone-in pork loin at on a kamado?
I pull at 61–62°C internal, measured in the thickest muscle clear of the bone — a degree below the 63°C I use for the boneless cook. The 40-minute rest in a cold oven carries the internal to 64–65°C at serve, safely above the UK food-safety guidance of 63°C for whole-cut pork. Pull at 63°C if you’d rather follow the guidance to the letter.
Do I need to rotate the rack or open the dome during the cook?
Not for this cook. At 140°C indirect the kamado does the work — the rack goes on bone-side-down, fat-side-up, and stays put for the full two and a half hours. I open the dome once at the ninety-minute mark to check the probe and again every 15–20 minutes after that, but the meat doesn’t need turning or moving. Hands-off.
Do I need a chined rack, or can I use any bone-in pork loin?
A chined rack — backbone cut along the join so the rib bones lift off cleanly after cooking — is what makes the carve work for the roast-style slice. Without chining, the bones don’t release cleanly and you’re stuck cutting individual chops instead. Ask your butcher to chine the rack; any decent independent butcher will know what you mean and do it for free.
How many oak chunks do I use for the smoke?
Two chunks the size of kindling pieces — small enough to smoulder rather than catch fire fast — added to the lit lump before the ConvEGGtor closes the firebox. Two is enough for a 2.5-hour cook at 140°C; the chunks smoulder gradually rather than burning off in the first thirty minutes. Apple, cherry, and hickory all work; oak is what I prefer for pork.
What’s the difference between this and the boneless pork loin recipe?
Same brine (3% salt + 3% sugar, 24 hours), same SPG rub family, same 140°C indirect kamado setup. What changes: the cut (bone-in rack vs boneless loin), the cook time (2.5 hours vs 90 minutes), the pull temperature (61–62°C vs 63°C), the rest (40 minutes vs an hour or more), and the carve format (slice the loin like a roast vs slice into rounds). Bone-in is the centrepiece version.
Can I carve the bone-in rack into chops instead of slicing it?
Yes — cut between each pair of bones for individual bone-on chops, one per person. I prefer to lift the bones off and slice the loin like a roast because it serves a sit-down Sunday lunch better, but the chop format is valid for a less formal meal where bone-on-plate is part of the appeal. Same brine, same cook, different carve.
Provenance and disclosure
This recipe is sourced from two cooks on my own Big Green Egg Large — Sunday 31 May 2026 (the first time I’d run this bone-in method) and Sunday 7 June 2026 (the same method, same butcher, same week, with smoked sausages added as the only variable). Both cooks used the same brine, the same dry-finish, the same SPG rub at 2:1:0.5, the same 140°C indirect setup on the BGE Large with two oak chunks for smoke, the same 61–62°C pull, and the same 40-minute cold-oven rest. The result was the same on both cooks: pink-medium slice edge to edge, visible smoke ring, juicy carve.
Both racks came from Graham Turner Family Butchers near Wisley in Surrey — a long-standing independent butcher with no website but a strong local reputation. The racks were chined on request at no extra charge. Smoke and Lump has no commercial relationship with Graham Turner Family Butchers — this is a customer recommendation based on the meat quality across the two cooks.
The BGE Large was a Christmas 2025 gift from my sister, originally supplied to her by Big Green Egg as part of a paid content partnership that has since ended. I own the unit outright. Smoke and Lump has no commercial relationship with Big Green Egg, and no commission, payment, or other consideration was received in connection with this recipe. The full chain of supply and our standing affiliate-network disclosures are on the Disclosures page.