Vertical-roaster chicken on the kamado
Published 18 May 2026 · Last updated 13 August 2026 · Tested by Ben Austen · Affiliate disclosure
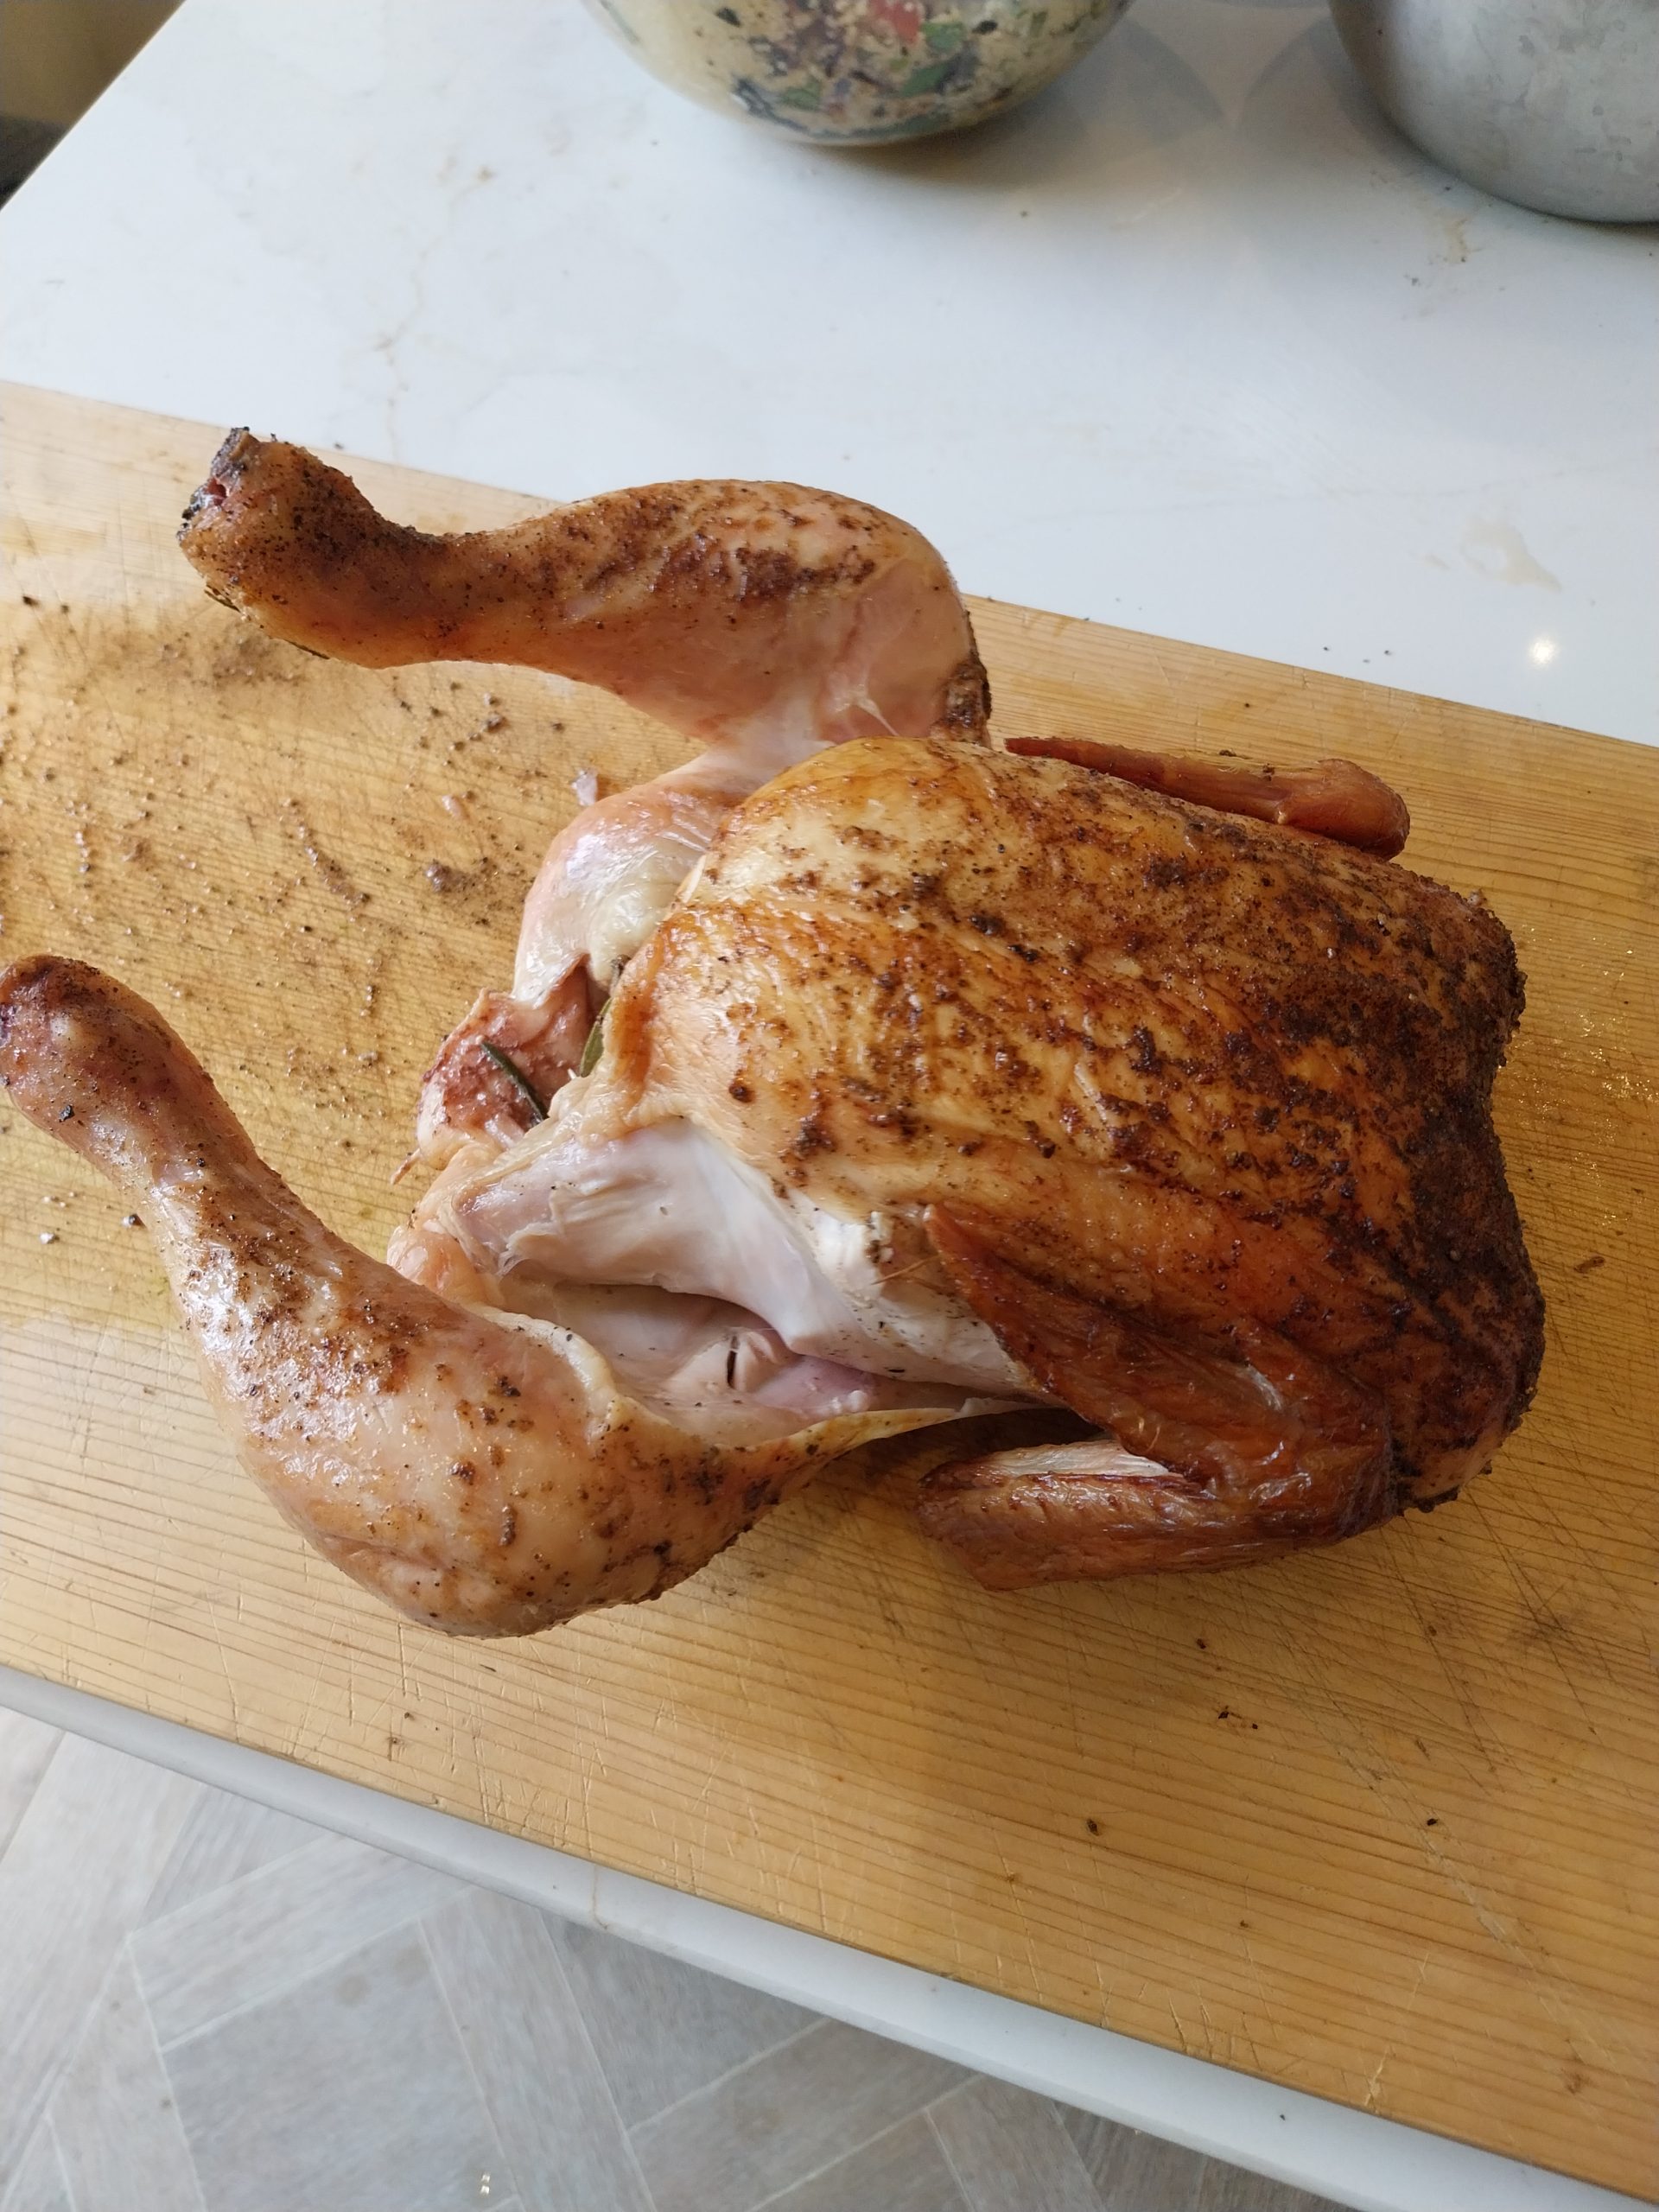
A just-under-2 kg whole chicken on a Broil King vertical roaster, brined for twenty-four hours in the same brine I use for my pork loin, aromatics dropped into the central cylinder of the roaster rather than stuffed in the cavity, then roasted on the BGE Large at 175–200°C with the vents wide before a reverse-finish to 220°C for crispy skin. The recipe is a synthesis — I cooked the original two times at 140°C and got soft meat both times, so the published recipe is the honest correction: hot is the answer for chicken, not slow. Updated 13 August 2026 after a third cook at 200°C throughout, which settled the texture question and made the 220°C finish optional.
Key takeaways
- The vertical roaster is the right kit; 140°C was the wrong temperature. Two cooks confirmed: at 140°C the chicken’s done-through but the meat texture is soft, not the firm-juicy bite you want from a roast. The recipe ships at 175–200°C base.
- Reverse-finish to 220°C for the skin. The skin doesn’t crisp at the base temperature alone — once the breast probes around 70°C, you open the vents wide and climb the dome to 220°C for the last ten or fifteen minutes. Skin tightens up properly; meat finishes at 75°C.
- Aromatics go IN the central cylinder, not stuffed in the cavity. Half a lemon, a few sprigs of rosemary and thyme — the hot cylinder vents steam up through the chicken from the inside out. Cavity-stuffing on a vertical roaster fights the geometry; cylinder-loading works with it.
- Brine is identical to the pork loin brine — 3% salt + 3% sugar by water weight, 24 hours. Chicken and loin can share a single brine vessel if you’re parallel-cooking.
- The drippings reservoir is a flavour-base, not waste. Pour the captured drippings through a fat-separating jug, fold the de-fatted juices through couscous as a side. The single best detail from this cook.
- One temperature is enough. Third cook in, the skin crisped at 200°C without the climb to 220°C. If you’d rather set the kamado once and leave it alone, 200°C throughout does the job.
- Breast and thigh finish 2–3°C apart at 200°C — 72–73°C breast, 75°C thigh, measured on the 12 August cook. That closeness is the vertical roaster earning its place: on a flat roast the breast is drying out before the thigh is safe.
At a glance
| Spec | Detail |
|---|---|
| Prep time | 15 minutes (active) — plus 24 hours brine, plus overnight dry-finish |
| Cook time | 45–60 minutes on the kamado |
| Total time | ~28 hours from brine-start to plate |
| Servings | 4–6 |
| Method | Kamado, indirect heat with reverse-finish |
| Temperature | 175–200°C base; 220°C skin finish optional |
| Difficulty | Medium |
| Equipment | Kamado, ConvEGGtor (heat deflector), vertical roaster, probe thermometer, fat-separating jug (optional) |
| Cuisine | British |
What you’ll need
Equipment
- A kamado-style barbecue capable of running 175–200°C steady and then climbing to 220°C for the reverse-finish. I cook this on my Big Green Egg Large. Any 46cm-class ceramic kamado with a heat deflector will work the same way.
- ConvEGGtor or equivalent ceramic heat deflector. Indirect heat is the whole point of the vertical-roaster setup — direct heat would scorch the skin before the meat’s anywhere near cooked.
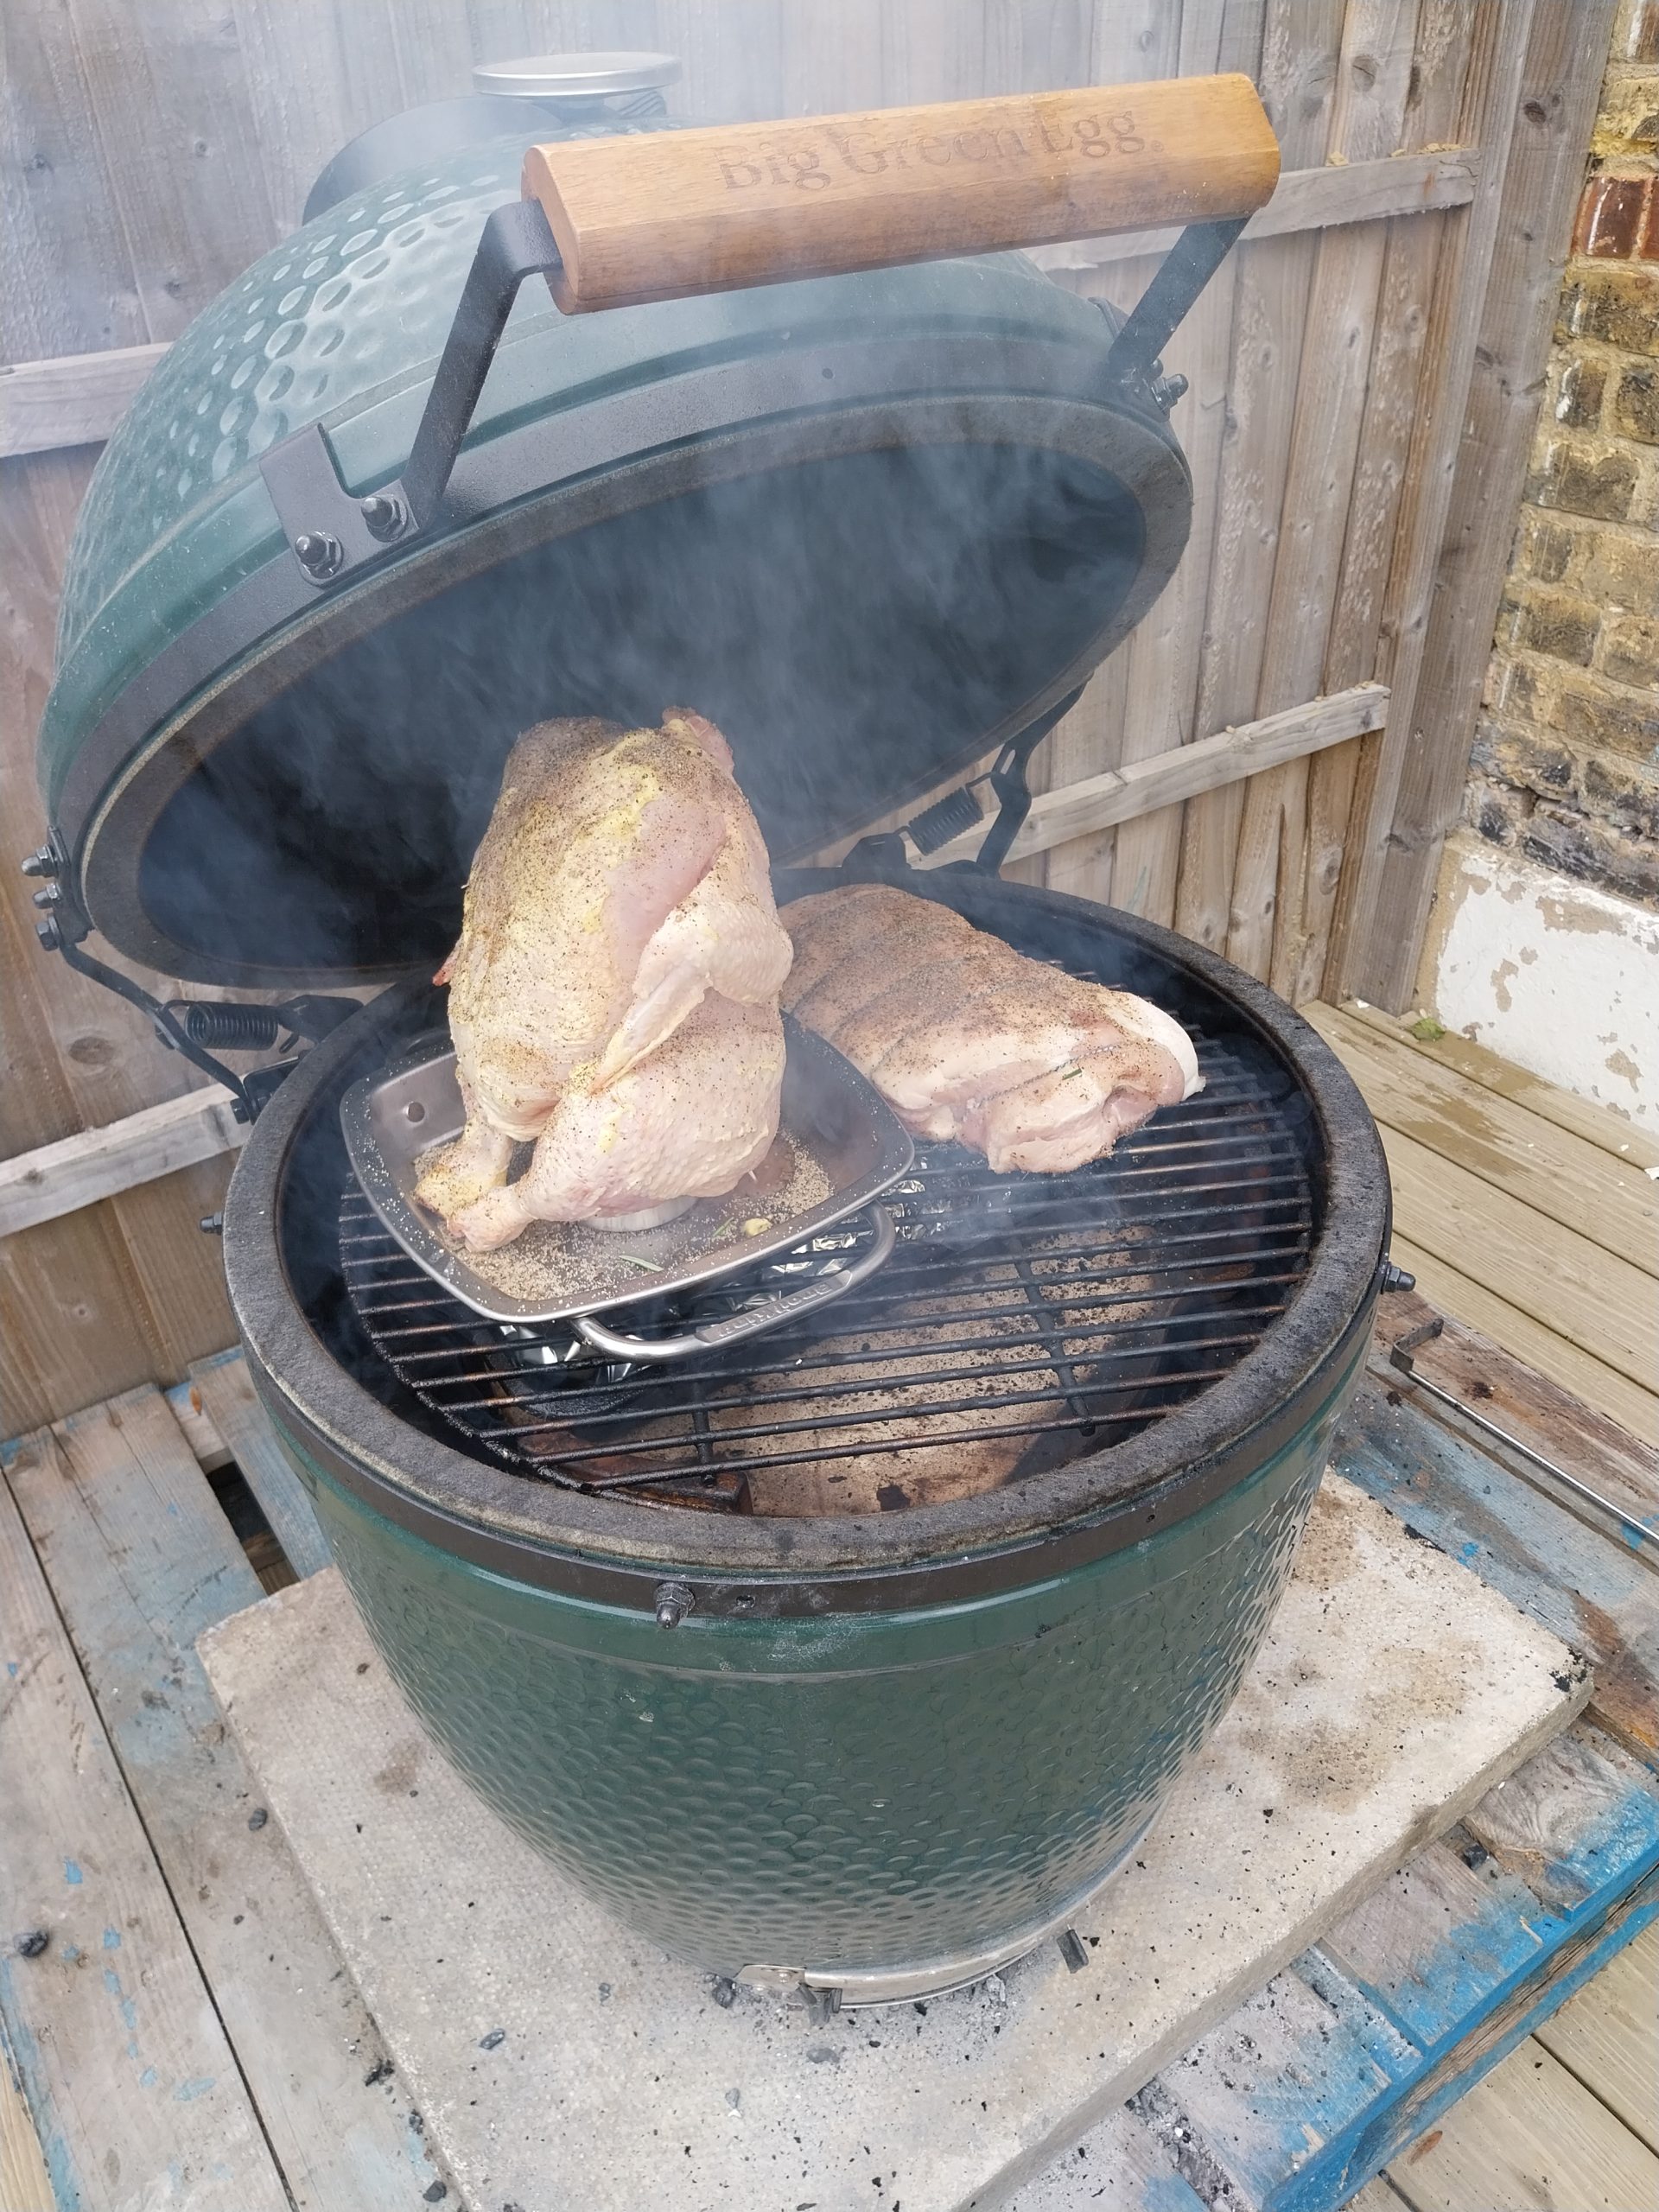
- A vertical chicken roaster. I use the Broil King — the central cylinder takes aromatics and the outer reservoir captures drippings. Beer-can-chicken stands work if the central cavity holds aromatics, though a proper reservoir-style roaster is the upgrade.
- A probe thermometer you trust. The pull point is 75°C internal at the thigh; if your thermometer reads two or three degrees off, the bird comes out either underdone or dry.
- A food-safe brining container (large Tupperware-style tub works) — the chicken can share the same brine batch as a pork loin if you’re parallel-cooking both.
- Aluminium foil to tent the bird while it rests.
- A fat-separating jug. Optional, but if you want the drippings-into-couscous side technique, this is the kit that makes it easy.
- A small handful of wood chunks for smoke. Oak is my default — apple or cherry are gentler alternatives and pair particularly well with chicken.
Ingredients
- 1 whole chicken, just under 2 kg. Big supermarket bird is fine — this isn’t a recipe that needs a £40 organic free-range to work.
- Table salt at 3% of the water weight in the brine.
- Caster sugar at 3% of the water weight in the brine. Equal parts to the salt.
- 1 tablespoon black peppercorns, whole, for the brine.
- 3–4 bay leaves for the brine.
- Half a lemon, cut crossways.
- A few sprigs each of fresh rosemary and thyme — straight from the garden if you have a herb patch.
- 2 oak (or apple/cherry) wood chunks for smoke.
- For the couscous side (optional but recommended): 200 g couscous, 350 ml hot drippings + stock, a small handful of chopped parsley.
The cook method
1. Brine the chicken for twenty-four hours
I weigh the water by vessel-displacement (the same technique as my pork loin brine) — drop the chicken into the brining container, fill with cold water until just covered, lift the chicken out, weigh the water that’s left. Then 3% of that water weight in table salt, the same again in caster sugar, peppercorns and bay leaves. Submerge the chicken, lid on, twenty-four hours in the fridge. If you’re parallel-cooking with a pork loin, both proteins can share the same brine batch — no need for two containers.
2. Dry-finish uncovered overnight
After twenty-four hours I lift the chicken out, pat the surface dry with kitchen paper, sit it on a rack over a tray, and leave it in the fridge uncovered overnight. The dry-finish is the most important single step for crispy skin. A wet skin going onto a kamado at 175–200°C never crisps properly — moisture has to evaporate before the surface can brown, and that evaporation costs the cook ten or fifteen minutes you don’t want to spend.
3. Load the vertical roaster — aromatics in the cylinder, not the cavity
This is the bit most recipes get wrong. The vertical roaster’s central cylinder is the steam vent — it carries hot air and moisture up from the kamado’s interior through the chicken from the inside out as it cooks. Filling it with aromatics means that steam is now flavoured steam — herby, lemony, garlicky if you want it — basting the inside of the bird through every minute of the cook.
I drop half a lemon (cut-side up) into the cylinder, push a few sprigs of rosemary and thyme down beside it, and that’s the cylinder loaded. The cavity stays empty — no lemon halves stuffed inside, no garlic cloves, nothing. The cavity needs to be open so the cylinder’s steam has a path through.
The outer drip reservoir stays empty at the start. It’s there to catch drippings as the chicken cooks — what comes out of it later is the couscous side’s flavour base, so don’t waste it by filling with water.
The chicken slides down over the cylinder with its legs splayed slightly, settles on the reservoir base, and the whole thing’s ready to go.
4. Set up the kamado at 175–200°C indirect
This is where I’d been getting it wrong. The original BGE Large launch cook ran the chicken at 140°C alongside a pork loin (same temperature for both meant a one-temperature setup that simplified the day), and the chicken came out cooked through but with soft, flat meat texture — not the firm-juicy bite of a properly roasted bird. I ran it again at 140°C a fortnight later expecting different results; got the same soft meat texture. Two cooks, same finding: 140°C is wrong for chicken meat.
Roast chicken wants hot. 175°C is the conservative end that still gives crispy-able skin and proper meat texture; 200°C is the more aggressive end that browns harder and cooks faster. I sit at the upper end of that range when the chicken’s the only thing on the kamado.
ConvEGGtor goes in, then the grid on top. Drop two small wood chunks onto the lit lump before the deflector closes the firebox. Let the dome settle at 175–200°C and hold there for ten minutes before the vertical roaster goes on.
5. Cook to ~70°C breast / 70°C thigh — about 45 minutes at 200°C
The vertical roaster’s geometry means the breast and thigh cook closer together than a horizontal roast — that’s the genuine advantage of the kit. At 200°C dome, a 2 kg bird typically gets to 70°C internal in about 45 minutes; at 175°C it’ll want 55–60 minutes. Trust the probe, not the clock — slide it into the thickest part of the thigh (next to the bone, not touching it) to read the slowest-cooking part.
I check at the 35-minute mark to see where the temperature curve is sitting, then every five minutes after that. When the thigh hits 70°C the breast is usually just behind — the vertical-roaster geometry produces a tighter breast/thigh differential than a horizontal roast, somewhere in the 3–5°C range at this temperature (versus 1°C at the previous-cook 140°C and 8–10°C on a horizontal roast).
6. Reverse-finish at 220°C for the skin — optional
Check the skin before you do this. On the 12 August cook it crisped at 200°C on its own and the climb wasn’t needed, so treat this as the move you make if the skin isn’t where you want it by the time the meat is ready.
If it does need help: when the thigh probes around 70°C, open both vents wide and let the kamado climb to 220°C. The deflector stays in; the cook stays indirect. The skin tightens up properly in this last ten-to-fifteen-minute window, going from “cooked but pale” to “crispy-amber” without overcooking the meat underneath.
I pull the bird when the thigh reads 75°C — five degrees above the start of the reverse-finish climb. The breast at this point usually reads 73–74°C and finishes by carryover during the rest.
7. Tent and rest 10–15 minutes
The chicken comes off the kamado onto a board, gets tented loosely with foil (don’t seal it tight — the steam will soften the skin you just spent fifteen minutes crisping), and rests for ten or fifteen minutes. Carryover brings the meat to 76–77°C; juices redistribute through the muscle.
8. Drain the drippings reservoir for the couscous
While the bird rests, I lift the chicken off the roaster onto the board and pour the contents of the drip reservoir through a fat-separating jug into a measuring jug. Out comes the de-fatted brown-gold liquid that’s spent the cook absorbing every bit of smoke and seasoning that ran off the chicken. Top up to 350 ml with chicken stock if you’re short. Bring to a simmer, pour over 200 g of couscous in a heat-proof bowl, clingfilm the top, leave for five minutes. Fork through with chopped parsley.
9. Carve and serve
I carve the chicken on the board — legs off first, then breasts off the carcass, slice each breast across the grain at about a centimetre. The de-fatted-drippings couscous goes alongside. Roast vegetables or smoky-mayo potato salad make natural sides.
What to serve it with
The cook this recipe came from served the chicken alongside the BGE Large pork loin, the smoky-mayo potato salad, pork crackling from the bar-snack tray, and charred peppers and courgettes direct on the grid. The drippings-into-couscous side worked particularly well at room temperature — couscous holds heat poorly anyway, so it makes a sensible alongside-dish you can prep five minutes before the bird’s ready.
On the 12 August cook the chicken shared the fire with baked potatoes and a tray of duck legs. The potatoes are worth copying: Vivaldi, a cross cut into the top, no oil and no salt, straight onto the grid round the edge of the deflector for about fifty-five minutes. They came off at 96°C, dry and fluffy in the middle. They don’t pick up much smoke sitting up there — the texture is the reason to cook them this way, not the flavour — and I should have turned them once, because they were starting to char underneath by the end.
For weeknight repeats the chicken stands alone with a green salad and the couscous, or with new potatoes and a fresh herb salsa. The tarragon-with-chicken pairing in the potato salad recipe was chosen specifically for this bird — if you’re running the chicken without the salad, fold tarragon through the couscous instead.
What I learned, and what I’d do differently next time
140°C is wrong for chicken meat texture. This is the single thing I’d put highest in the recipe — and it’s the lesson that took two cooks to see clearly. The BGE Large launch cook ran the chicken at 140°C alongside a pork loin (one temperature for both meant a simpler setup). I read the cooked-through chicken as a win — particularly the 1°C breast/thigh differential at pull, which is genuinely narrow for a whole bird. But the meat texture was soft, not the firm-juicy bite you want from a roast. I ran it again a fortnight later at the same 140°C and got the same soft texture. Two cooks, same finding: the geometry advantage of the vertical roaster is real, but 140°C is below the temperature window that gives chicken its proper texture.
The honest correction is that narrow findings from a specific cook profile are diagnostics, not recommendations. A 1°C breast/thigh differential at 140°C tells you about the roaster’s geometry — which is excellent — not whether to cook chicken at 140°C. The geometry advantage carries to higher temperatures (175–200°C+) which is where the recipe wants to live. Use the vertical roaster, but cook it hot.
Cavity vs cylinder for aromatics: cylinder, every time. Stuffing the cavity with lemon and herbs on a vertical roaster is fighting the geometry — the cavity needs to be open for the cylinder’s steam to flow through. Aromatics in the cylinder put the heat-vented steam through the bird from the inside; aromatics in the cavity sit there and don’t do anything useful. I’d been splitting them between cavity and cylinder for the first few vertical-roaster cooks and it took comparing a cylinder-only cook against the cavity-split cook to spot that the cylinder-only result was meaningfully more aromatic.
The drippings-into-couscous side is the unsung hero of this cook. Most recipe-blog vertical-roaster chickens treat the drip reservoir as a waste-catcher to clean up afterwards. Defat the contents and fold them through couscous and you’ve got a side dish that tastes more of the cook than anything else on the plate — every bit of smoke and seasoning that left the bird is in there. Worth a fat-separating jug if you don’t already own one (£10–15, paid for itself in two cooks).
Update: the 12 August cook — 200°C the whole way
I cooked this again on 12 August, and this time I didn’t need the 220°C finish. The bird was a supermarket chicken of about 1.6–1.8 kg, on the roaster at 200°C indirect with the deflector in, and the skin crisped at 200°C on its own. The dome drifted up a little towards the end without me touching the vents — and I think 200°C the whole way would have done the job.
That makes the reverse-finish a safety net rather than a stage. If the skin isn’t where you want it when the meat’s ready, open the vents and climb. If it’s already crisp, you’re finished.
The texture question is settled. Both original cooks ran at 140°C and both gave me soft meat, and the correction to 175–200°C was reasoning from that rather than something I’d actually cooked. This cook tested it, and the texture was what you want from a roast chicken — firm and juicy rather than flat. The geometry advantage I’d claimed carries to the higher temperature does carry.
Breast and thigh landed 2–3°C apart. The breast came off at 72–73°C and the thigh read 75°C. The recipe above estimates 3–5°C at this temperature, so the real gap is a little tighter than I’d guessed — and that closeness is the entire argument for cooking a chicken vertically. On a flat roast the breast is drying out by the time the thigh is safe to eat. Here they arrive together, both where they should be.
That’s one cook rather than a rule, so I’ll take both readings again next time and see whether it holds.
Variations
On a kettle barbecue with an indirect setup (coals to one side, vertical roaster on the other), the principle should transfer cleanly — same temperatures, same reverse-finish move, same cylinder-loading rule. I haven’t run this specific cook on a kettle but the underlying technique doesn’t depend on the kamado’s ceramic.
In a domestic oven at 200°C fan-assist, the brine, dry-finish, and cylinder-loading all stand alone — the cook works fine without the kamado’s smoke layer. You’ll lose the wood-smoke flavour, which is a real loss for this dish (chicken takes smoke beautifully), but you’ll keep everything else. The reverse-finish to 220°C still works.
For a smaller chicken (~1.5 kg) drop the cook time by 10–15 minutes and start probing earlier. The temperature targets don’t change — 70°C breast for the reverse-finish start, 75°C thigh for the pull.
For a bigger bird (2.5 kg+) consider spatchcocking and cooking flat rather than vertical — at that size the vertical roaster starts to feel out of its depth and the breast can dry out before the thigh’s done. Spatchcock + flat direct-heat at 200°C suits a bigger bird better than vertical roast.
As a single-temperature cook, run it at 200°C from the start and skip the climb — that’s what the 12 August cook did, and the skin crisped without it.
Spice rub variations: the brine plus the dry-finish does enough seasoning that a rub isn’t strictly necessary — but if you want one, a paprika-and-thyme rub works well (smoked paprika is the obvious move with a kamado cook). Avoid sugar in the rub — there’s already sugar in the brine, and skin-side caster sugar burns at 220°C in the reverse-finish window.
Related
- BGE Large pork loin recipe — the protein this dish was originally cooked alongside, sharing the same brine
- Smoky-mayo potato salad — the side that paired with this bird on the original cook
- Pork crackling on the kamado — the bar-snack bite-size method — the third dish from the same Sunday cook
- Big Green Egg Large — Tested by Ben review — the kamado I cook this on
- About Ben — who’s behind this
Frequently asked questions
Why not just cook the chicken at 140°C with the pork loin to simplify the setup?
That was my first instinct too — one kamado temperature, both proteins on at the same time, no faff. It produced a chicken with a 1°C breast/thigh differential (genuinely narrow, a real win for the vertical roaster’s geometry) but with soft, flat meat texture rather than the firm-juicy bite of a proper roast. I ran it again at 140°C a fortnight later expecting better results and got the same soft texture. The recipe pivots to 175–200°C because that’s the temperature window roast chicken meat actually wants — the geometry advantage carries; the original temperature was wrong.
What internal temperature should I pull the chicken at?
75°C measured at the thickest part of the thigh, next to the bone but not touching it. UK food-safety guidance for chicken is 75°C minimum — going to 80°C+ dries the breast meat. The vertical-roaster geometry means the breast lags the thigh by 3–5°C at this temperature, so pulling at 75°C thigh gives you a 70–72°C breast that finishes by carryover during the rest.
Do I really need a probe thermometer?
Yes. Chicken’s window between underdone (food-safety risk) and overdone (dry breast) is narrow — the difference between 73°C and 80°C internal is the difference between juicy and sawdust. A probe thermometer is the only reliable way to land in that window. Any decent instant-read or leave-in probe works.
Can I skip the dry-finish if I’m short on time?
You’ll lose the crispy skin if you do. The dry-finish is the single most important step for skin that crackles — moisture has to evaporate from the surface before the skin can brown, and an overnight uncovered dry-finish in the fridge does that work without costing cook time. If you’re truly time-pressed, pat the bird dry with kitchen paper and run an extra five minutes at 220°C in the reverse-finish window, but the result won’t match the overnight dry-finish.
Why aromatics in the cylinder and not stuffed in the cavity?
The cylinder’s a steam vent — hot air and moisture flow up through it and through the chicken from the inside out during the cook. Filling it with aromatics flavours that steam. The cavity needs to be open so the cylinder’s steam has a path through; stuffing the cavity with lemon and herbs blocks the geometry that makes the vertical roaster work. Cylinder for aromatics, cavity stays empty.
What’s the right wood for chicken on a kamado?
Apple or cherry. Both lighter than oak, both pair particularly well with chicken — apple gives a sweet-mellow note, cherry adds a hint of fruit without overwhelming. Oak works too (it’s my default because I have bags of it from a tree at my parents’) but apple is the more flavour-appropriate choice if you have both on hand. Avoid mesquite (too aggressive for chicken) and anything resinous (pine, fir).
What do I do with the drippings reservoir contents?
Pour them through a fat-separating jug (the type where the fat floats and you decant the liquid off from below). The de-fatted liquid is concentrated chicken-and-smoke flavour — fold it through couscous as a side dish, or use it as the base of a quick pan sauce, or freeze it for soup later. Don’t discard it; that’s the cook’s flavour-base in a jug.
Provenance and disclosure
This recipe is sourced from two cooks on my own Big Green Egg Large — Sunday 3 May 2026 (the BGE Large launch cook) and Saturday 9 May 2026 (the same method repeated as a second data point). Both cooks ran the chicken at 140°C, and both produced soft meat texture that prompted the editorial pivot you’re reading. The recipe published here is a synthesis: the geometry-and-aromatics finding from those cooks combined with the corrected base temperature (175–200°C) and reverse-finish technique that the soft-texture findings pointed to. I ran the corrected recipe end-to-end for the first time on 12 August 2026 — a third cook, at 200°C throughout — and the update section above carries what it changed. The corrected temperature is the move; the geometry is the win that carried from the original cooks.
The BGE Large was a Christmas 2025 gift from my sister, originally supplied to her by Big Green Egg as part of a paid content partnership that has since ended. I own the unit outright. The Broil King vertical roaster I bought myself — no commercial relationship with Broil King. Smoke and Lump has no commercial relationship with either brand, and no commission, payment, or other consideration was received in connection with this recipe. The full chain of supply and our standing affiliate-network disclosures are on the Disclosures page.
Sourced from the 3 May 2026 and 9 May 2026 cook logs — two BGE Large cooks that surfaced the meat-texture finding the recipe corrects against — and updated from the 12 August 2026 cook, the first run of the corrected method end to end.